Wednesday 31 July 2013

Product Showcase | Wrapped In Joy Embossing Folders


 Wrapped in Joy is a collection inspired by vintage wrapping paper and the precious gifts within, filled with beautiful Christmas designs perfect for Xmas Cards and projects this year.. All designs are available in 5x7 and A2.

A Magical Time

Cardinal

Christmas Morning

Reindeer Games

Poinsettia Lullaby

Wild Holly

Peace and Joy

Jolly Christmas

Moonlit Berries

Christmas Carols


*Shiping September 2013 | Pre Order from your local store

Tuesday 30 July 2013

Acetate Card by Bridget Louw

Hi Bridget here, making an old favourite using acetate and some wonderful Couture Creations products.


Cut a piece of acetate 5.5” x 11” scored at 5 ½”
For the punched border you will need a piece 2 ½” x 5 ½” Score in half length-ways and punch with your favourite punch or decorative die
 
From the Nesting Dies: Scallop Square (C0723043) I cut the 2nd largest scalloped square from patterned paper twice. I stamped my image onto white card and cut out the second largest square from the Nesting Dies: Square (C0723042).


Colour the image with markers. 
To assemble, layer the square onto the scalloped square using some Double Sided Tape (C0721984).
Because the card has an acetate base you will have to glue the 2nd scalloped square on the inside of the card to hide the back of the paper on the front.

Glue the punched border piece on the spine of the card.
Decorate the front of the card with Couture Creations adhesive backed rhinestones in a coordinating colour.

Voila...all done!


Couture Creations products used

 
I hope you like my card and will try making some cards with the amazing product range from Couture Creations.

Join us on Facebook and don’t forget to “like” our page.


Monday 29 July 2013

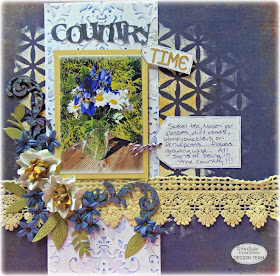
Country Time by Patti Hamil

Hello, it's Patti with another variation of a bloom made with the Daisy Nesting dies. There are so many different ways to customize hand-made blooms, I really enjoy playing around with them. This one turned out pretty cute! First, here is the finished page.

These flowers were all picked within a mile of my house while walking on a dirt road! I put them in a mason jar glass!!! Lots of perks to living in the country!!!


The first thing that I did was to use the Large Damask Flourish embossing folder from the Elegance Collection and emboss 2 pieces of white cardstock. I cut it into one long section and just embossed each end. I then used two colors of ink, one purple and one blue to get the desired color to match the background.


I also used a chipboard flourish from Imaginarium Designs. I used the same two colors of ink and then topped it off with a coat of the Glitzin Glamour in Crystalina. Such a pretty look!!!


Now for the blooms.  I used the Daisy Nestiing dies in the two smallest sizes. I used the largest of the two for the white outer blooms and the smaller for the yellow centers. I started by inking the edges after cutting them out.


I snipped into each one between each petal, make sure not to snip all the way to the center.


Next spritz with water and curl up as shown.


Let dry, and then carefully pull apart the petals with your piercing tool. Be careful not to tear the tiny petals.


Once unfolder, you can layer them and put them together!!!


After putting all four layers together this is how it will look. You can play around and curl, fluff or do whatever you want with the blooms!


Here you see them on the page, along with the little blue blooms that I used a tiny dot of the Gold Glitzin Glamour for the centers! You can also see where I embossed a piece of green cardstock with the Hyper Magical folder from the Fresh & Fun collection and cut out leaves from it.


Here are some closeups, here you see part of the chippie with the Glitzin Glamour and some of the tiny blooms.


A few more close-ups.


Couture Creations products used:


I hope you enjoyed this post, and I really appreciate you stopping by, please check back to see what else the Design Team has to share!!!

Friday 26 July 2013

Two Pocket Card by Kerrie Gurney

Hi Kerrie here with a clever card for you. I love creating this card for special occasions, you can get everyone to sign the tags or you can replace one of the tags with a gift card.
It is super easy to create with just a single sheet of  8.5" x 11.3/4" (A4 for us Aussies) cardstock.


fold cardstock in half long side


undo and fold in half short side
 
unfold and cut the side into the middle fold line


fold the bottom right corner up to the centre fold line
 
 
fold the top left corner down approx 1" to 1.5" from center fold line

 
fold the left top side over to the right

 
fold the whole bottom half up

 
and fold left side to the back, this gives you your pockets...easy :)

 
place whole card excluding the back flap in Extra Loren embossing folder

 
Emboss

 
Sand whole from of card using sanding block to bring out the core colour

 
Place tape as show and adhere into place
 
Die cut 1 Fantasia Dazzling Doily Die and cut 1 third off and use the bigger half on the front of the card


Cut Tags to fit pockets 1 x 5.1/4" x 2.1/2" 1 x 5 3/4" x 3", cut some pennants with scrap paper and die cut a label using Victorian Rectangle Nesting Die, embellish with flowers, chipboard butterflies and crystal gemstones


I hope you have enjoyed this tutorial ...happy creating
 
 
Couture Creations Products Used
Couture Creations Premium Non Stick Scissors



Thursday 25 July 2013

30 Minute Project by Bridget Louw


Hi Bridget here again with another quick and easy project to make,using an array of wonderful Couture Creations products.


Every now and again I need to make a quick project in a hurry and this is my favourite “go-to” project. It is not heavily embellished and uses only one piece of 12” cardstock and one sheet of patterned paper. Thanks to the dies and embossing folders from Couture Creations this project takes under 30 minutes start to finish.

Cut your 12” sheet of cardstock in half, so 2 pieces 6” x 12”. 


Score both pieces at 4” & 8”. 


Place some Double Sided Tape (C0721984) behind the end panel of the one piece and overlap with the first panel of the second piece to create one long concertina.

To decorate each panel, cut 5 pieces from the patterned paper, measuring 3 7/8” x 5 7/8” each. The paper I used for this project already had 6 pieces measuring 4”x6” so I just trimmed them slightly smaller.

Using the Nesting Dies: Ovals (C0723045) I cut out the 2nd largest scalloped oval from 2 of the panels to put a photo behind. I die cut another oval from another small piece of patterned paper and embossed it with the Raphael embossing folder to decorate the first panel.


All that is left to do is to decorate each of the panels with ribbon, alphabet stickers etc. 


30 Minutes start to finish and your project is done.

Couture Creations products used


I hope you will try making this super easy project with the amazing product range from Couture Creations.

Join us on Facebook and don’t forget to “like” our page.