Saturday 31 January 2015

Back to School Class with Tracey Cooley at Craft Giraffe

#couturecreationsaus

If you are in Brissie and surrounds well then you need to get yourself along to
Tracey Cooley's first class for 2015
at Craft Giraffe

Tracey is teaching a fabulous layout featuring our Couture Creations decorative dies and our gorgeous Vintage Rose Garden patterned papers
Tracey is the queen of handmade flowers and you will be too after taking Tracey's class.

Here are the details and the links
you can book online or pop into the store to book your place

COUTURE CREATIONS CLASS 
Back to School with Tracey
Sat 7 Feb
2015 - 9:30-11:30am
$29.00
(which includes all materials including a die that is yours to take home)



Friday 30 January 2015

Love Layout by Tina Connolly

#couturecreationsaus

Hi there, it's Tina here.
 I'm sharing with you today, a layout I created using one of my favorite photos of my Mum and her sister, taken when they were little.


I created a frame using "Heavy Stripes" from the Vintage Rose Garden collection.  Cut four strips with the same section of pattern.  Overlap each strip at a right angle, and cut the top piece at 45 degrees to give a mitered corner.  Use foam tape to raise the frame, and attach to background paper.


I created a garland effect using `Classic Vine' cut in half.  Use the Two-way Glue Pen to allow you to stick the fine die-cuts with ease - no more yucky clumps of glue making shiny marks on your creations.


Die-cut a doily and layer with some strips of muslin behind the photo.  Tuck 'Love Abounds' die-cut behind the photo on the right


Using a Chandeliers die-cut, thread some ribbon through the holes along the top, and embellish with Pink Blush Pearls.  Adhere 'Vintage Roses' on the edge of your photo to frame it.


Couture Creations products:
Vintage Rose Garden papers
CO724042 Vintage Rose Intricutz Dies - Vintage Roses
CO724046 Vintage Rose Intricutz Dies - Classic Vine
CO723519 Secret Treasures Dies - Fan
CO723247 Momento Ornamental Lace Dies - Chandeliers
CO724003 Floral Lace Die - Love Abounds
CO723243 Madeline Ornamental Lace Die - Les Fleurs
CO721997 Pearls - Pink Blush


Thursday 29 January 2015

Couture Storage by Tracey Cooley

#couturecreationsaus
Hi Everyone

I like many of you out there in Scrapping Land have a bit of an addiction to products and all the pretty things available, and find myself wondering where to put it (yes even in my scraproom). I do loath when my strings get into a tangled mess so I set to finding a way to keep them all nice but accessible and here is what I came up with.
 
These little lovelies are made from 2 small Pringles tins (cause once you pop you can use them as storage). Simply cut some Couture Creations Vintage Rose Pattern Paper to fit the size and using some Couture Creations 18mm Double Sided Tape adhere to the tin.

Then using one of the new Couture Creations  Frames and Frills Bobtail set, take the border and cut once ten slide the cardstock along to line up again and cut again. repeat until the desired length is achieved.

After attaching 2 of these borders, on to the top and one the bottom of your tin, cut a Tag from the Couture Creations Everday Essentials tag and Flourish set.
 ( I printed my label with the computer first)


add this to the front of your tin and decorate with some flowers and some of the string you intend to store in it. Then pierce a hoe into the middle of the lid of your tin with the pokey tool from the Couture Creations Hand Held Essenttials


Then cut the small round lace Die from the Bobtail frames and frills set and attached to the lid. It has a handy little hole in the die cut.. its perfect.

Then add some flowers around the hole for added decorations.. Then cut a set of Couture Creations Floating leaves and cut to separate. Along with a set of Couture Creations Every Day Essentials Edith and baby butterflies


Tuck the leaves amongst the flowers that you have embellished with, add the butterflies and give them a little sparkle with some Couture Creations Glitz n Glamour.


then add your roll of string and thread it through the top of the lid....


and voila!!!!  No more knotted mess!!


Thanks for Stopping by!

http://jordayla.blogspot.com.au/


Wednesday 28 January 2015

The Story by Jowilna Nolte

#couturecreationsaus


Hi
Jowilna here, and Today I am sharing how I created a layered look with two different dies - nothing out of this world but the effect is so easy and so gorgeous - plus with all the new die releases up for 2015 - this look can be achieved using any of the new backgrounds and frames! I can't wait to experiment even more!


For my layout I combined the scallop rectangle nesting die and the beautiful Lotus Fillet | CO723240 
die to create an extended photo matt.


 I used scrap papers for all of the die-cuts. I first cut the large scallop and then cut the scallop piece into two horizontal halves. These pieces will form the top and bottom edges of my matt.


 Then use the Lotus Fillet | CO723240 die and cut the left and right hand side of your matt. My patterned paper piece was too small, so i simply positioned it onto the die on each side and cut them.


 Place the four sides overlapping onto each other and then position your matted photo onto the base - if you are happy with the look, adhere everything together to form an extended photo matt.


 I added the matted photo to my layout and then added some additional embellishments. I used this lovely chipboard frame from Imaginarium designs and cut it in half as well to compliment the look, and use it in two places on my layout.


 I added machine stitching all around the photo, and this also held the die-cut elements in place with the edges loose adding to the informal look.


 Repearting all the elements at the bottom of my layout with the beautiful chipboard element dressed up in some Prima heavy gesso and sewn to the layout.


I used this beautiful die from the Ornamental range Lotus Fillet | CO723240 die


Keep in mind that if you miss a die collection from Couture Creations you may not be able to get a hold of it again - so don't delay in getting the new designs as they are amazing! Visit your local craft store and make sure you ask for them by name. Also check out the website for new releases and the blog for some amazing inspiration.


Tuesday 27 January 2015

In Your Heart by Mel Connell

#couturecreationsaus

 Hello Everyone. 

Well it's a new year, hope you all enjoyed your holiday season with family and friends. 

I hope you have loved seeing all the new 2015 releases that Couture Creations has in store for you this year. Some really, really yummy stuff coming. 

So today I wanted to share with you a card I made this past week. I don't know about you but I do find myself looking for fresh inspirational quotes at the beginning of a new year. 


I have used the Cuckoo Clock die set from the Vintage Rose dies collection. I just love this for using my quotes stamps on. It's just enough space and fits really well onto the front of a card. 


I've inked around the edges of the die cut with some brown ink and my sponge dauber and added a few gems for a touch of sparkle. 


Using the Classic Vines Die from the Vintage Roe collection also I have cut one out of a pale coloured paper from the Vintage Rose 6x6 paper pad. Cut it apart to use smaller portions to add some foliage behind the flower on the front of the card. 


I have fussy cut some of the floral designs from one of the sheets also from the Vintage Rose 6 x 6 paper pad and used these as embellishments in the bottom corners of my card. 


Couture Creations Products Used:


Monday 26 January 2015

Happy Australia Day

#couturecreationsaus
#australiaday

We wish you all a wonderful Australia Day 


and something to get you in the mood for celebrating everything great about our country


Friday 23 January 2015

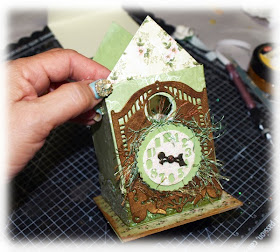
Cuckoo Clock Gift Box by Sue Smyth

#couturecreationsaus


There always seems to be a Birthday or occasion where I
need a small gift. So little gift boxes like this are just 
the ticket.
The lid lifts up on one side so you can fill
the cuckoo box with sweets 


To start with cut a sheet of Vintage Rose garden paper
to 30 x 12 cm. 
Score at every 7.5 cm along the 30 cm side
And at 10 cm along 12 cm side as pictured above.


Cut clock die from brown cardstock and rub over 
with gold paint or gold medium 


Cut a square of chipboard 10 x 10 cm and cover 
with patterned paper.


Cut a hole at the top of box front, to fit the die.

Fold up box and adhere tabs together. Adhere clock to front
of box. Cover clock face with white glitter 
or Glitzn' Glamour Crystallina, allow to dry.

 Cut small scalloped circle and layer over clock face
with 3 D foam tape.
Wind around fibres and add metal clock hands 


Cut 2 triangles or use a kite die and trim to
make the under eaves. Adhere to top of box.
Add small pearls to hide the join.

Also die cut Chandelier border and cover with 
white glitter, adhere to bottom edge of box.
 

Cut out cream cardstock to create a roof, 16 x 9 cm approx.
Fold in half.
Cut out 14 scalloped edges from dark brown cardstock
and adhere to cream cardstock.

Handy Hint 
Cut strips of brown cardstock and 
die cut with scalloped rectangle. 
There is no need to cut the whole rectangle
just along the edges will do. 


Flick up the scallops with your fingers
and dry brush with gesso.


Add a bird attached to a bamboo skewer in the hole 
at the top of box.
Wrap around a picket fence or similar to base.
And die cut Vintage Rose Daffodil spray  
and affix to top of box with 
a paper rose 

Attach roof on one side with hot glue and allow the
other side to lift up.


You can decorate this box as you desire.
add rhinestones or ribbons to personalize it


Couture Creations Materials 
Craft Concepts  Kite Nesting Dies CR371245

Happy Crafting