Tuesday 30 June 2015

Glittery Love by Kerrie Gurney

#couturecreationsaus

Hi All 
Kerrie here with a quick card share


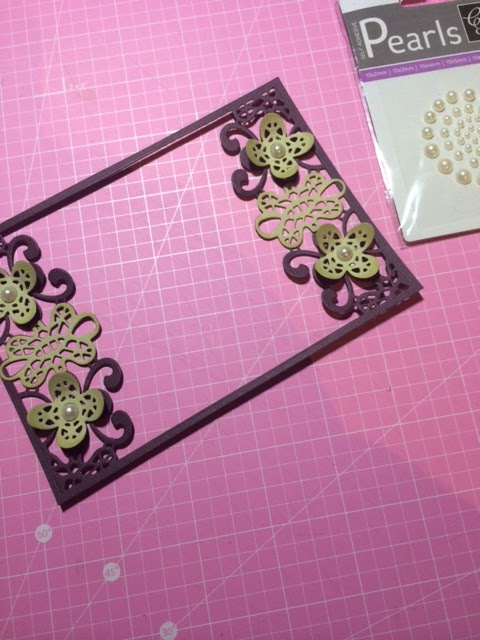
To create this card start by diecutting Vierge Square die from the Elegant Card Cuts collection using purple cardstock  cut down so it is just a tad larger than the die to create a border
Next cut a piece of white cardstock to create a 15cm square card and a piece Pansy Dressing (the B side) to cover the card front
Cut another piece of white cardstock the same size as your diecut and place strips of 18mm double sided tape to cover the entire card.
Then remove all the backing paper from the double sided tape and adhere the die cut to the piece of card and ahdere to card front
Next sprinkle fine white crystal glitter to the whole card and press down to make sure all the glitter sticks, shake off the excess and you have a super sparkly card
Next diecut 1 x Anastasia doily die from white cardstock, tie a piece of ribbon around and adhere to card using foam tape
Colour a paper flower with sprays and adhere to doily pop on a word
Ink the edges of your card and your are done


 Happy Creating 


Monday 29 June 2015

Cogs and Gears by Tracey Cooley

#couturecreationsaus


Hi Everyone 

I seem to struggle a bit with male orientated Cards, could be the fact that I have two daughters but every now and then they will be invited to a boys birthday party or such and I never ever have male/boy cards made up waiting to be used. So..... I thought I would give one a go using the Couture Creations Mikashet Emboss Folders and some Kalini Dies.


First off I embossed some white cardstock with the Couture Creations Mikashet Grungy Cogs n Gears Emboss Folder 


Then using some scrap cardstock I cut the Couture Creations Everyday Essentials Chevron Arrows 3 times.to form a stencil.


I then squeezed a good amount of Couture Creations Silver Glitzin Glamour into a small container and added some loose blue glitter and stirred to make my very own Glitter Paste.


Using the stencil I made from the Chevron Arrow I wiped the glitter paste over the top of my cogs n gears Embossed base.


I took the homemade stencil off to reveal my awesome pattern and then dried it with my Couture Creations Heat Tool 


I then added some white Muslin over the top and with the same embossing folder, embossed a chipboard star. 


Then I cut some cogs out with the Couture Creations Kalini Gears 2 Dies and along with Couture Creations Heat Tool and Non Stick Craft Mat embossed the gears with some silver embossing powder. 


Then I used the remaining bit of Glitter Paste on some arrow Chipboard, I then added all these to the fornt of my card. 


Right... That should do nicely for the next 6 yr old male birthday party that my daughter springs on me at the last minute because the invitation has been in her school bag for a fortnight!!!!


Sunday 28 June 2015

Birthday Wishes by Guest Designer Bridget Louw

#couturecreationsaus


We have all been in that situation, last minute scramble for a handmade card, asked for by a family member or one we simply forgot to make. The card I made today as my last project as Guest Designer for Couture Creations for June is super quick and easy to make. The dies are so pretty that one doesn't need much else.


I started off with a 5x7" card base (10"x7" scored at 5"). Using a matching moss green cardstock I cut a rectangle at 4 7/8" x 6 7/8" panel. I used C0724192 Pansy Dreaming from the Hearts Ease collection for the front panel which measures 4 3/4" x 6 3/4". Using Old Paper Distress ink I sponged all the edges. 


One of my favourite new dies has to be C0724101 Barossa  Frame. It creates the loveliest little panel for a card and even has two extra dies in it to allow layering. The main frame was cut out of an eggplant cardstock and the extra bits out of the same moss green cardstock I used on the front panel.


I added some of the Sticky backed pearls to accentuate the centre of the flowers and curled the petals up for a slight 3D effect.


The last step before assembling is to cut out an oval from the Hearts Ease Collection using C0724171 Through the Hourglass paper and the larger oval with flourishes from the C0724249 Mirrored Flourishes Die set. Using any stamp of your choice, stamp an appropriate sentiment onto the oval. 


Assemble the card as per the picture and in under 10 minutes you have a card ready to go without too much fuss. (Or too much mess in your craft space). Thank you Couture Creations for making crafting so quick and easy.

Couture Creations Products Used:

C0724249 Kalini, Mirrored Flourishes Die
C0724101 Elegant Card Cuts, Barossa Frame Die
C0724170 Hearts Ease Paper Pad


Thank you all for following my 2 posts during June and thank you Couture Creations for the lovely opportunity to be your Guest Designer for June.

Until next time, Happy Crafting


Saturday 27 June 2015

Ta Promm by Cindy Porter

#couturecreationsaus


Hi everyone, it's Cindy here with my second blog post for the month.... I'm excited to share another layout I created using the new Heart Ease paper collection.


 To create this layout I began by die cutting from Core'dinations Cardstock....

I cut two sets of the Nesting Dies Victorian Rectangles....I set them up on my magnetic platform to cut as frames...


I cut the Honeypot die.... of which I only wanted to use the small confetti pieces...


and I cut the Simone's style border 


I used Hearts Ease paper as my background  and marked out my photo position ... Then with a stencil I die cut from a  glossy magazine cover, I applied white sand texture paste around the marked area...


Once dry... I inked over the texture paste and inked up the die cut nested frames...
I adhered some of the honeypot confetti to the background and adhered the inked frames...


a close up of the texture and inking...


 I added some cotton thread under the photo, which is mounted up on foam tape...


to finish off the layout I coloured up some of the bulk white flowers, and cut a couple of Cycad Fern leaves...


Dies used:

Tools and Accessories used:
Adhesives used: 

till next time
happy creating


Friday 26 June 2015

Life is Beautiful Canvas by Tina Connolly

#couturecreationsaus


Hi there, today I thought I'd go crazy and add lots of die-cut layers to this canvas I created for my eldest daughter.  As you can see from the picture below I've used quite a few!


To create my background I applied modelling paste through a 'Rowena' diecut, and allowed it to dry.    I sprayed some mists, and once dry,stamped with Stazon ink using the gorgeous Hearts Ease stamp sets.


Most of the die-cuts were heat embossed which created a a lovely contrast to the other textures.


Die-cut two of Megan's Magic. trim center section and cut in half diagonally, and heat emboss.


Colour flowers using mists and Glitzin' Glamour Glitter Glue


Cover a diecut heart in Hot Pink Glitzin' Glamour Glitter Glue, allow to dry and repeat this process until fully covered


Couture Creations products: