Saturday 30 July 2016

BE MERRY | CHRISTMAS 2016 PRODUCT SHOWCASE

#couturecreationsaus #ultimatecrafts

Hi Everyone
We are super excited to share with you all our 
Be Merry is designed by our very own Queenie Yeung and is available in two very different collections giving you a choice of an Elegant Classic Christmas or a Fun Bright Christmas.


Both Collections offer 12x12 and 6x6 Paper Pads along with a collection of matching Ephemera Packs, Pearls, Glitter and a selection of Specialty Papers 
and a fabulous set of dies and stencils to go with both collections


pick up a copy of our Creative Inspiration Magazine from your local papercraft store or view it online HERE

Our Couture Creations Be Merry Collections are shipping to stores next week. 
Order your favourites now as this is a limited release and once they are gone they are gone for good.

Be Merry this Christmas Season 


Friday 29 July 2016

Love Magnolia Layout by Kerrie Gurney

#couturecreationsaus #ultimatecrafts
#kerriegurney

Hi Everyone 
Kerrie here with a layout of my baby girl celebrating her Sweet 16th birthday
all papers, dies and embossing folders are from the gorgeous
Ultimate Crafts Magnolia Lane Collection


1.       Die cut  Damask Frame using white cardstock to use as a stencil
2.       Using the damask die cut apply texture paste randomly onto base Ivory Cardstock
3.       Sprinkle Iridescent Glitter onto the texture paste while it is still wet and set aside to dry or dry off using heat tool
4.       Cut 1 x 21cm x 11cm mat from Rosehip Memories (B side) patterned paper
5.       Cut 1 x 2505cm x 9cm  strip from Floral Fancy pattern paper
6.       Cut 1 x 6cm x 25cm strip from Sweet Music (B Side) pattern paper
7.       Cut 1 x 15cm x 14cm piece from Butterflies and Lace pattern paper
8.       Cut Butterfly label from Poetical Labels pattern paper
9.       Emboss Sweet Music strip using Petite & Tied Together Embossing Folder
10.   Distress the edges of all pieces including ivory cardstock base and lace border from ephemera pack
11.   Diecut Magnolia Corners from Rosehip memories paper B side
12.   Layer all pattern paper pieces onto base card (for more dimension use some foam mounting tape on some of the layers)
13.   Add photo (or photo can be added later)
14.   Embellish using diecuts, ephemera pieces and ribbon

15.   Finish off with a sprinkling of Pearls and a little Glitzin’ Glamour Crystalina Glitter Glue 


Products Used

Photo Size; 4x6 Portrait 


Thanks for stopping by
Don't forget to follow the Artdeco Creations Blog and also follow Couture Creations|Ultimate Crafts on
FacebookPinterestInstagram and Twitter


 Happy Creating 


Thursday 28 July 2016

Paradise by Guest Designer Robyn Wood

#couturecreationsaus #ultimatecrafts
Hello everyone!
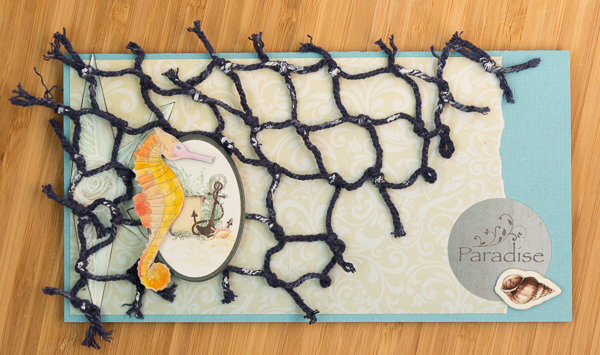
It's Robyn Wood joining you again as a guest designer and I'd like to share another card I created with the Sea Breeze Collection. The various pieces of the collection work really well together to give a lovely variety of cards.


For this card, I used a less common card base size of 20 cm x 21 cm to really show off the blue netting that is part of the Sea Breeze range. The netting is cotton and very easy to manipulate by cutting, painting and inking.
I love the damask pattern on the Sea Breeze paper and used it as a base for my card. I think it will be very useful for non-ocean themed cards! I cut a piece measuring 18 cm x 10 cm and tore a small strip off a short end before affixing it to my card front.


The same sheet of paper has a subtle compass image and I thought it would look good peeking out from beneath the blue netting so I fussy cut it out. The compass image needed a little more embellishment but some sponging with blue ink, a few lines and scribbles with a white gel pen and black ink on the edges did the trick nicely. The adhesive sticker sheet that comes with this Collection suits a variety of uses and I popped out the Paradise circle and added it to the right hand lower corner. One of the tiny shells from the Adhesive Chipboard pack adds a bit of interest to the greeting.


I draped the end of the blue netting over the top left hand corner of my card and sniped a portion of it free. I wanted to tone down the dark blue and a few flicks of watery gesso gave it a good aged effect. Once dry, I attached it over the card front.


There is a trio of seahorses on the Seahorses & Gingham sheet so I added a bit of colour to them using dye markers. Sometimes markers can be a bit dark for the image you wish to colour, so I scribbled them onto a Non-stick Craft Mat and added colour to the images using an Aquash brush. A fine wet paint brush will also work well. I coloured two seahorses so that when layered, a bit of colour peeks through.


The seahorses were fussy cut and layered onto the side of the anchor oval from the Adhesive Chipboard pack and then nestled into the netting to finish off my card.

Couture Creations products used

I hope you enjoyed learning how I created this card. It has been a pleasure to work with the Sea Breeze Collection this month and I was honoured to be chosen as a guest designer to inspire you!


Wednesday 27 July 2016

Dream Big Layout by Anita Enright

#couturecreationsaus #ultimatecrafts


Hi Everyone, hope you are having a wonderfully crafty week.  
I am sharing with you one of, I would have to say, my favourite layouts that I have done in a long time.  It is showcasing the wonderful Sea Breeze collection that has not only wonderful dies, but also papers, embossing folders and embellishments.  It is the perfect packaged set.

 
 TO START I selected one of the gorgeous papers in the Collection Paper pack and using a sunburst stencil and texture paste added some some highlights to the paper.


If you want the drying process to speed up use your heat gun, however be careful so that the paper doesn't buckle.  If it does, I find turning the paper over and warming it up helps bring the paper back into shape again.
I then chose a couple of pearlised/shimmer sprays to spritz over the paper.  Below are a couple of photos that show how pretty the paper looks once spritzed.


Next I chose a selection of papers from both the 12" and 6" paper pads that matched in with the background paper I chose. I tore some and cut others and then inked the edges.
 After mounting my photo on some white cardstock, I then took the photo and my bundle of patterned papers and layered them to see how I like the look together.  So that I didn't forget the finished layering I took a quick photo .


I can't help myself when it comes to the Couture Creations flowers, and this layout was no different. I love the Cottage Pollen flowers and those centers, yum, but didn't want the entire flower, so I just used the center petals.  Keep the rest as you just need to add a bit of bling or embellishment to the center and you have another larger flower for another layout.
I inked around the edge of my now smaller flower.  See the before and after flower below. I made two for this project.

I fell in love with the Seashells dies and just had to use them in this layout.  I only chose one of the seashells to use along with the starfish.  I cut out two of each in two coordinating colours. Next I glued them done on to the alternative colour and fussy cut around each of them.

How gorgeous do they look!!!!

 Finally just put it all together.  I glued all the paper down and mounted my photo on mounting tape to make it pop.  I added a couple smaller flowers and heat embossed my title, added a metal charm and one of the cabochons and I'm done.

 I hope you like what I've created.
Below are some more close ups of the layout.


Products Used

Thanks once again for stopping by.
Come visit again tomorrow to see another wonderful creation from the Creative Team.

Anita xx


Tuesday 26 July 2016

Secrets of the Ocean Card created by Adriana Bolzon

#couturecreationsaus #ultimatecrafts


Hello there everyone, Adriana here today and I am sharing another card created with Couture Creations paper and products especially with the new release papers
SEA BREEZE designed by Denise Boddey 
which they are now available at your local scrapbooking store. 

This card is so simple to create, along with the Sea Breeze stamp set and papers from the Sea Breeze collection. 
Today I have created an easel card created with 2 stamp sets

"Under the Sea" C0724676
and
"Beside the Beach" C0724677

"Secrets of the Ocean" card by Adriana Bolzon


Using the small paper pad "Sea Breeze" C0724651 for the papers.


To create the top part of the card I cut these papers as shown below.
Inked the edges and stamped around the edges of the kraft card stock.
Using a Circle Nesting Die C0723040, cut a circle for the top layer of card front.


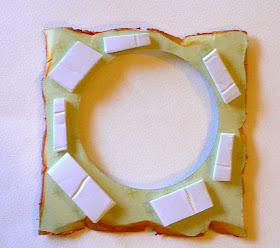
Place foam tape underneath the cut out circle.


Using the stamp sets
"Under the Sea" C0724676
and
"Beside the Beach" C0724677

Stamp the following stamped images with Brown and Teal stamp ink pad.


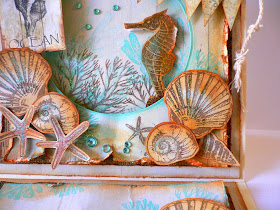
I stamped all the shell, seahorse and starfish images and coloured them in with watercolour pencils, cut them out and attached them around the front of card. I also added some Glitter Glue Crystallina here and there.


Layer all the top papers on top of each other, a shown below.


Creating a banner is so easy with the small paper pad cutout elements in the paper pad, and a bit of White netting.


So that's all for today, I hope you like this collection as much as I do, here below are all is the links to the latest online magazine and with some wonderful creations to inspire you all, and also the links to the products on the website.
Creative Magazine Issue #16 HERE

Until next time, Thanks for looking :)
Cheers Adriana XXX

Sea Breeze products
view all products HERE

Couture Creations - Sea Breeze products
Stamp set "Beside the Beach" C0724677
Stamp set "Under the Sea" C0724676
Sea Breeze small paper pad C0724651
White Netting C0724733

Other products
Couture Creations Products

3D Glue Dots C0723817
Crystalina Glitter Glue C07221971
Tall Cards - Cream C0724847 
Sponge Dauber C0723061
Gemstones Jade C0724155
Double side tape 
Double side foam tape
Turbo Glue Pen C0724389

Please make sure you add your email address to get the latest newsletters.

Don't forget to join 
Couture Creations FACEBOOK

for all the latest updates from Couture Creations.
Thanks for looking
Cheers Adriana XX