#couturecreationsaus
Hello and welcome!
Julianne here today, sharing an easel card, created with Couture Creations Core Nesting Dies, bulk white flowers, and the beautiful Hearts Ease paper range.
So are you ready to create this gorgeous, and very simple, easel card? Let's have some fun!
STEP 1: Take two 6"x12" pieces of cardstock (the colour is irrelevant as it will be covered). Fold each piece of cardstock in half. Using the largest Scallop Circle Nesting Die, cut out two die shapes, but make sure the top of the die sits above the fold in the cardstock. This ensures that the cardstock is not cut right through, and will remain as one piece, instead of two separate pieces.

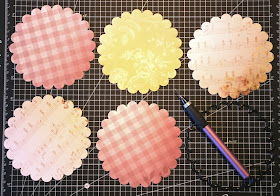
STEP 3: Using the same large Scallop Circle Nesting Die, choose several different patterned papers from the Hearts Ease collection, and cut out five single die shapes (not folded like the cardstock).
STEP 4: Take the cardstock die shapes, and work out where you will have to cut off a small amount of the ends, so that the card can fold gently. It's just a matter of laying the cut die pieces on top of each other, with them overlapping in the centre (so it looks like three scalloped circles, not four).
STEP 5: Once the edges have been cut off, glue the die cuts together (using the Turbo Glue Pen for ease of application), overlapping in the centre, and creating three circlular scalloped shapes. So the centre scalloped shape is actually double the thickness, and is stronger, to help hold up the card. You can see where I have cut the edges (on the red cardstock), so it doesn't get in the way, when the card is folded.
STEP 6: Choose three of the die cut patterned papers, and glue them to one side of the cardstock. This is the inside of your card. Trim any edges that may get in the way of the card folding smoothly and easily.
STEP 7: Flip the card over, and glue on the last two pieces of patterned paper. The piece at the top is the front of your card, so DO NOT trim any of the edges off. The last circle is not covered, as it is the bottom base of your card.
STEP 10: Continue with your embellishments. I have added a Hearts Ease chipboard piece to the left side of the card, and laid a quote (from the Hearts Ease papers) over the top, using foam tape. I have added the large flower to the right side of the card, and finished with some fussy cut pansies, and the smaller flat flower sitting in underneath, at the top of the card. Finally, I have added a cut out dragonfly (with foam tape), some 2mm gemstones around the outside edge of the card base, and around the quote, and highlighted the fussy cut leaves and flowers with Glitzin' Glamour glitter glue.
And there you have one very pretty easel card, to share with a loved one or friend. And don't forget, you can create an easel card using any of the Core Nesting Dies - the only limit is your imagination.


