Saturday 30 January 2016

Magnolia Heart Card by Tracey Cooley

#couturecreationsaus

Hi Everyone 

I created this card for a show on Create and Craft UK that was aired live at CHA where I was honoured to have launched Ultimate Crafts Magnolia Lane Collection designed by my friend Sue Smyth, but unfortunately time ran short and I did not have time to demonstrate it on air so, lucky for me that I get to show you all here.


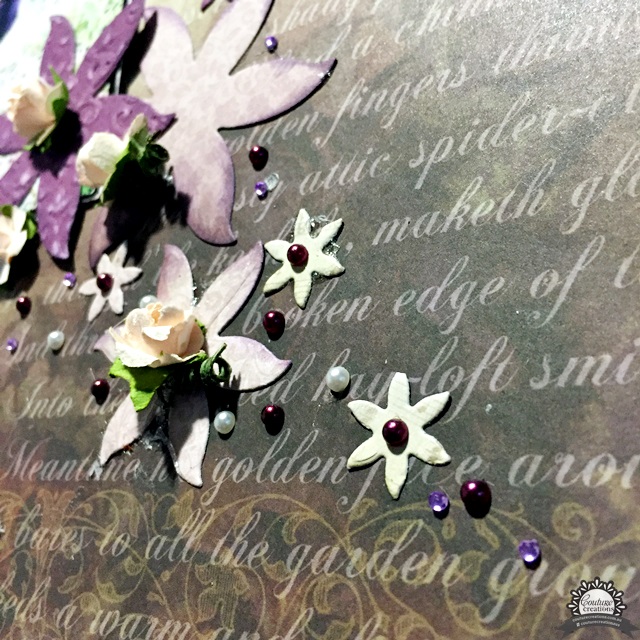
The First thing I did with this gorgeous Collection was to head to the 6x6 paper pad and chose this beautiful script floral page as my background. I then distressed the edges and attached it to pink card base with Couture Creations 12mm double sided tape.
From matching Ultimate Craft card stock I cut the Magnolia Heart Die and popped it in the middle of my card.


I then took the gorgeous Magnolia Lace Stamp Set and stamped the "just Because" across some white cotton, frayed the edges and backed it with some Magnolia Lane white Decorative Lace. I attached this across the Magnolia Heart Die Cut.


Then I took the smallest petal from 3 Paper Magnolias and attached hem and some silver string to the top arch or the Heart die cut. I added Bling and pearls from the Magnolia Lane Bling Flourishes and tucked in some Decorative Lace for effect.


I then finished it all off with some gorgeously pearlescent Magnolia Lane Resin Frames.


Thanks so Much for stopping by, I hope your 2016 is full of crafty goodness.
Products Used 


Friday 29 January 2016

Mishka by Tina Connolly plus bonus

#couturecreationsaus

Here's one you probably weren't expecting from me... a clean and simple layout!  I just adore this photo of my cat Mishka, and wanted to keep the focus on her sweet face.  I used the Hearts Ease papers as they toned in beautifully with my photo.


I made multiple cuts with the Star Of Jasmine die, and inked the edges.  I embossed the cardstock pieces and sanded them.


I added Premium Adhesive pearls and Gemstones and some of the adorable new 1cm paper flowers.


Bonus layout......Ever have too many photos that you want to include on your page, but still want space to include embellishments and journaling?  Here's a great solution to that challenge.


I die-cut some pieces to use as simple embellishments.


I embossed some of my paper layers using Woodgrain and Geo Squares.


The chipboard letters were embossed using Grunge Frame and Woodgrain, then inked.


I created a flap to allow extra photos and journaling to be added without taking away from the design of the page.  I was able to fit eleven photos (with space for up to fifteen)!


Couture Creations Products

Bonus Project


Thursday 28 January 2016

Flower Girl by Tracey Rohweder

#couturecreationsaus

And hello there crafty friends! 
Nice of you to pop by and visit us here on the Couture Creations blog. 
Are you as excited as I am by all the recent CHA updates and releases? 
My golly GOSH!  It sends crafters (me included) into a frenzy! I can't wait to get the new products and start creating with them.  If you did miss out on any of our exciting updates, have a look 
through our CHA 2016 sneak peak posts and see all the amazing new 
releases coming very soon to a store near you.  
One of my most favourite things about crafting is that there is no right or wrong.  
There really isn't a "Craft Rule Book" that you need to follow.  Pretty much anything goes!
And I love being able to use things in ways they weren't necessarily designed for. 
 Every time I use my Quick Release Die Paper I admire how pretty it is, and how the pattern would look lovely on the background of a layout. 
So that's exactly what I've used as my background "patterned paper" & teamed it with darling little doilies from the Perfectly Petite Doilies Die Collection
And I just love how it's turned out! 
I probably mention most posts just how AMAZING this paper is.  
It's without a doubt a game changer. And here is another use! 
I've cut a length of Quick Die Release Paper longer than my white 12x12 Ultimate Crafts white card stock. Approx. 16inches long.  I've then pleated the end of the paper, and cropped off any excess. 
The only thing with using the Quick Release Die Paper like this, is that it's meant to be 'non-stick', so doubled sided tape isn't going to hold it.  I've used the 15mm Jumbo Tip 2 Way glue stick around the edges and also attached some mini staples.  
I've mounted my photo on layers of cardstock and vellum and then a final layer of Quick Release Die Paper. So that it sticks to the white cardstock background, and I've stapled a small square of off cut cardstock to the photo mats and mounted on foam tape
Using a piece of 18mm doubled sided tape I've pleated some gold tissue paper from under the photo to the edge of the page.  I had some white card stock form another project that had been sprinted with gold, so have cut 18 doilies (using your Quick Release Paper!) and adhered them to the right hand side of the layout, in the pleats and around the photo.  The majority were adhered with doubled sided tape, and a few with 3D Mini Foam Dots to add some depth & dimension.          
                      
Who doesn't love a doily? There are 12 gorgeous designs in Perfectly Petite Doilies range - it's so hard to choose which ones to use! I've chose 4 that complimented each other, but were still different. 
I've printed my journalling, cut into strips and placed on the layout with 6mm double sided tape.  With the accent strip, I've mounted the words on 3D Foam Strips, on top the gold tissue paper which had 6mm double sided tape on the back.  I've added my favourite 2mm Crystal Gemstones on either side of the word strips, 3 to the top of my photo, and to a few of the side doilies.
All that's left is to add a title, and you're done. 
So I'm here today to remind you to step outside of the box, follow your own rules and look at things in a different way.  You never know what you might use! 
Until next month my friends.

Be sure to check the Couture Creations Blog to be inspired 
by the amazing ladies on the Design Team. 
You can also follow Couture Creations on
FacebookPinterestInstagram and Twitter. 
Couture Creations Products Used
Have a crafty day! 
Tracey R
xx


Wednesday 27 January 2016

Matchbook Mini Albums by Julieanne McKenna-De Lumen

#couturecreationsaus


 The charm of these mini matchbook albums is that they are quick and simple to create. They can be used as brag books for family & friends, as little thank-you gifts, or even as party favours. And even better, is that they can be coordinated to suit any theme or colour. The options are endless. 
Here's a list of what you will need: Perfectly Petite Doilies Dies, cardstock and Vintage Rose papers in the colours of your choice, white flowers, a stapler (and staples), a ruler, a pencil, tape, and 3D glue spots. 
 
 
Step 1: Cut cardstock to 3" x 6". (Cut one piece for each album that you plan to create). Using a light pencil and ruler, mark the inside of the cardstock at 0.5" and at 3.5". These are your fold lines. 
 
 
Step 2: Folding. Fold the cardstock at the inside marked edges (0.5" and 3.5"). The small 0.5" piece of uncovered cardstock will become the front flap. Fold the rest around to create the album. 


Step 3: Using a stapler, add two staples to the front flap (as shown). 


Step 4: Open the album and flip it over to the outside cover. Cut a piece of paper to 2.5" x 5.5". Adhere the paper to the outside of the cardstock with double-sided tape. If the paper is too long (this may happen due to the fold lines), just trim with a ruler and cutting knife. 
 
 
Step 5: Fold the album back up. Cut a strip of coordinating paper at 0.5" x 3". Using double-sided tape, adhere to the front flap, covering the staples.
 
 
Step 6: Cut out a perfect doily die with a coordinating piece of paper. Adhere with glue to the center of the front cover of the album.


Step 7: Using 3D Glue Spots, adhere a white flower to the center of your doily. 
 
 
Step 8: Cut a piece of coordinating paper to 2.25" x 11.5". This is your inside flap for photos and/or journaling. Using a light pencil and ruler, mark on the back side of the paper at 2 and 14/16", at 5 and 12/16", and at 8 and 10/16". These are your fold lines. 


Step 9: Fold as marked, creating an "M" shape fold, as shown.
 
 
Step 10: Place tape on the back side of the folded paper (first panel only), and adhere to the inside of the matchbook. 
 
 
Step 11: Decorate your album as desired. I have added gemstones to the outer edges of the doilies, pearls to the center of the flowers, and drawn hand stitched borders with a ruler and black felt pen. Other options could include adding glitter glue or spraying your flowers with a coloured spray mist.  
Congratulations, your album is now complete. 
All you need to do is add your chosen photos and/or journaling. 
Thank-you for stopping by today, and allowing me to share my mini matchbook albums with you. 
 
 
COUTURE CREATIONS PRODUCTS:
CO723971 Vintage Rose Paper Pad 12 x 12in
CO724062 Vintage Rose Paper Pad 6 x 6in 
CO724137 So Lace Perfectly Petite Doilies
CO724142 Ebony Perfectly Petite Doilies
CO724143 Cherish Me Perfectly Petite Doilies
CO724146 Lullabies Perfectly Petite Doilies
CO724287 White Flowers English Roses 3.5cm
CO724288 White Flowers English Roses 2.5cms
CO724297 White Flowers Camden Cottage Roses 3cms
 CO721988 Gemstones & Pearls Sparkling Champagne
CO721996 Gemstones & Pearls Crystal 
CO721997 Gemstones & Pearls Pink Blush
CO721999 Gemstones & Pearls Cafe Creme 
 
Don't forget you can find us on Facebook, Pinterest and Instagram.
Cheers and happy creating, xxx