
#artdecocreations #couturecreationsaus #ultimatecrafts
Hello and Welcome back. Katrina with you today and I am sharing a few alternative ideas using the new heat activated foils from the new Go Press and Foil Machine range together with the beautiful new range of Dies from the Let Every Day be Christmas collection.
This is something everyone can do whether you have the new Go Press & Foil Machine yet or not.
All you need are your standing cutting dies, the heat activated Foils and the very handy, Ultimate Crafts - Die Cut n bond adhesive and your options are endless.
This is also something very easy that I have found the kids enjoy also and we have step by step photos to show you how.


As the different light catches your foils you will see beautiful effects.

Cut your Die Cut'nBond to fit your Die shape and adhere to the top side of your cardstock. I have used the Snowflake Doily Die with the Snow White cardstock.

Gently peel away the top protective layer so you are left with the sticky bond ready for your foils.

Cut a small piece of foil. A little goes a long way. With your coloured side up, gently tap the underside, lift and repeat either randomly or in specific spots. I have started with the Red Matt foil.

3 colours gives a nice mix, so being inspired from the colours in the Let Every Day Be Christmas range, I have also used the Blue-Green Iridescent and the Blue Mirror Foils.

Continue to tap on your colours until there are no sticky areas left on your die cut.

Create a square card base, 15.25cm (6inches), from the Caruso Cardstock.
Cut a matt from the Mirror Foil Board - Silver Lines design, 11x14cm.

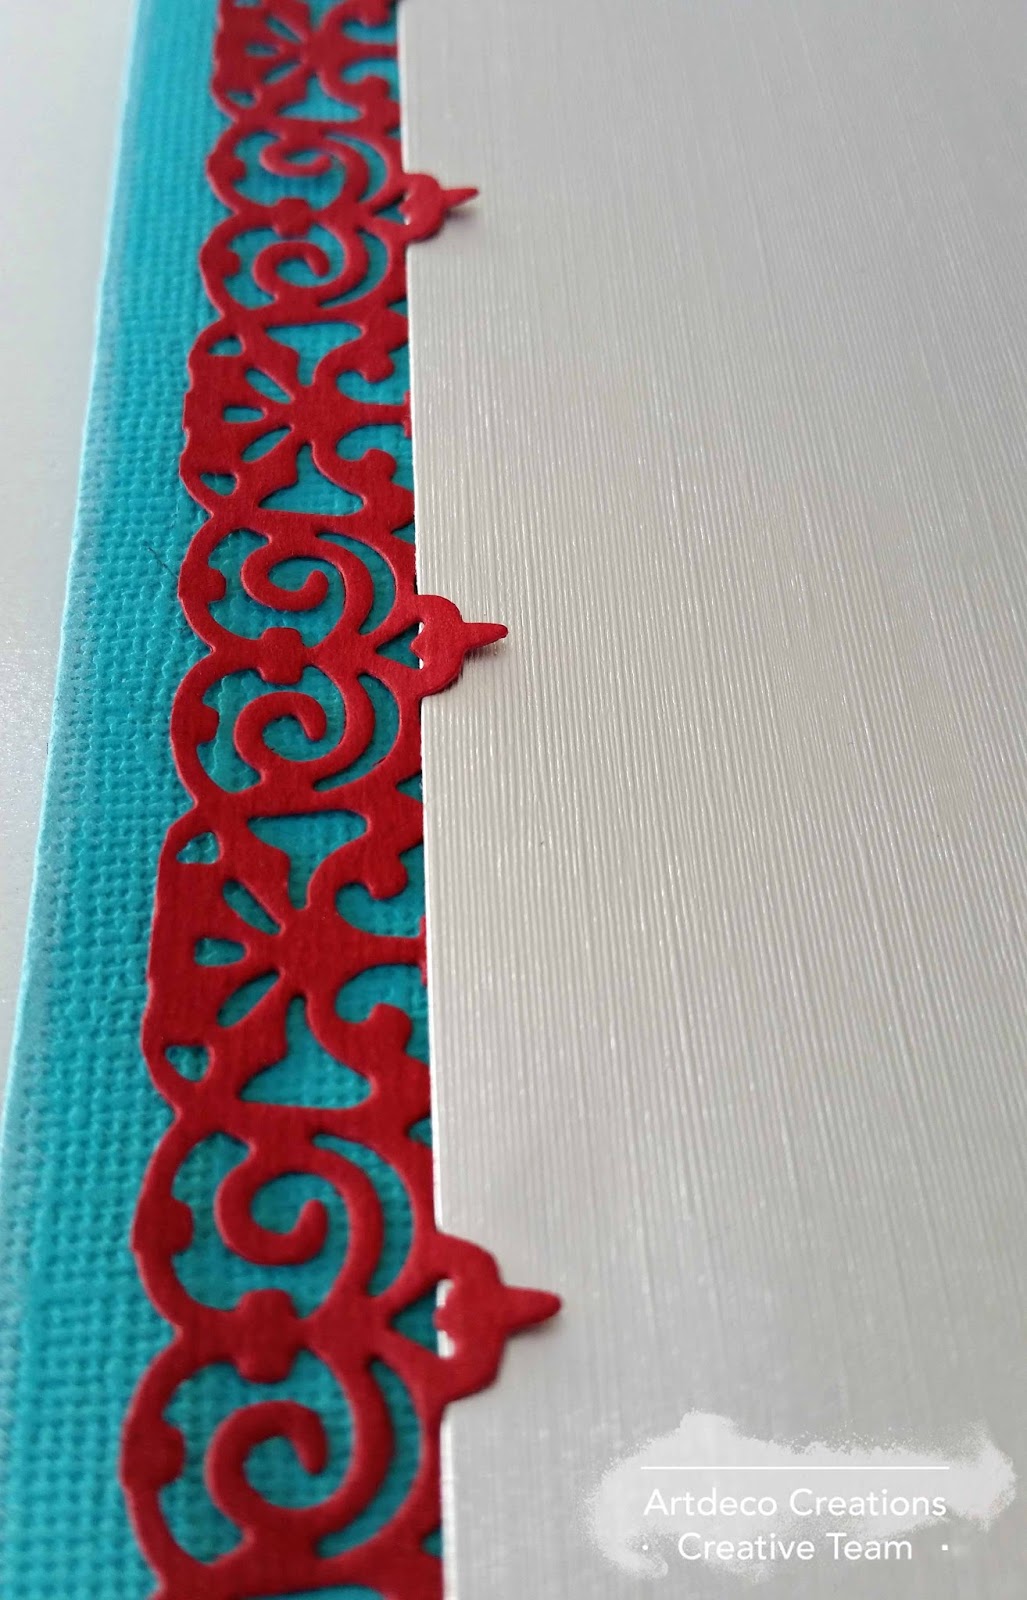
Cut a panel from the Christmas Baroque Background Die in Garnet cardstock.
Cut a Merry Christmas and Snowflakes Mini Die set, Snow White cardstock using Die Cut'nBond.

I found separating the decorative panel elements from the die and using them as side strips on the silver panel complimented the snowflake centrepiece.

Attach 2 matching red strips to either side of the silver mat and attach the piece to the card base.

Separate the Merry and Christmas, then apply the same foiling technique to each piece.

Attach the snowflake to the centre of the card front.

Add Couture Creations, 'Crystal' Adhesive Gemstones.

Attach each of the Die Cut elements to balance your card.
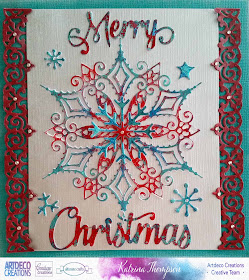
Dab some Red Glitzin'Glamour to the Decorative borders to give them some shimmer.


I hope you enjoyed todays tutorial, until next time, Happy Creating!! K x
Products Used:
CO725513 Snowflake Doily Die
CO725509 Merry Christmas Decorative Die
CO725515 Christmas Baroque Background Die
CO725521 Snowflakes Mini Die
CO725361 Couture Creations Heat Activated Foil - Red Matte
CO725392 Couture Creations Heat Activated Foil - Blue Green Iridescent
CO725358 Couture Creations Heat Activated Foil - Blue Foil Mirror Finish
ULT200001 Snow White Cardstock
ULT200030 Caruso Cardstock
ULT2200067 Garnet Cardstock
CO724156 Crystal Gemstones
CO721979 Red Glitzin' Glamour

This is something everyone can do whether you have the new Go Press & Foil Machine yet or not.
All you need are your standing cutting dies, the heat activated Foils and the very handy, Ultimate Crafts - Die Cut n bond adhesive and your options are endless.
This is also something very easy that I have found the kids enjoy also and we have step by step photos to show you how.

As the different light catches your foils you will see beautiful effects.

Cut your Die Cut'nBond to fit your Die shape and adhere to the top side of your cardstock. I have used the Snowflake Doily Die with the Snow White cardstock.

Gently peel away the top protective layer so you are left with the sticky bond ready for your foils.

Cut a small piece of foil. A little goes a long way. With your coloured side up, gently tap the underside, lift and repeat either randomly or in specific spots. I have started with the Red Matt foil.

3 colours gives a nice mix, so being inspired from the colours in the Let Every Day Be Christmas range, I have also used the Blue-Green Iridescent and the Blue Mirror Foils.

Continue to tap on your colours until there are no sticky areas left on your die cut.

Cut a matt from the Mirror Foil Board - Silver Lines design, 11x14cm.

Cut a panel from the Christmas Baroque Background Die in Garnet cardstock.
Cut a Merry Christmas and Snowflakes Mini Die set, Snow White cardstock using Die Cut'nBond.

I found separating the decorative panel elements from the die and using them as side strips on the silver panel complimented the snowflake centrepiece.

Attach 2 matching red strips to either side of the silver mat and attach the piece to the card base.
Separate the Merry and Christmas, then apply the same foiling technique to each piece.

Attach the snowflake to the centre of the card front.

Add Couture Creations, 'Crystal' Adhesive Gemstones.

Attach each of the Die Cut elements to balance your card.

Dab some Red Glitzin'Glamour to the Decorative borders to give them some shimmer.


Products Used:
CO725513 Snowflake Doily Die
CO725509 Merry Christmas Decorative Die
CO725515 Christmas Baroque Background Die
CO725521 Snowflakes Mini Die
CO725361 Couture Creations Heat Activated Foil - Red Matte
CO725392 Couture Creations Heat Activated Foil - Blue Green Iridescent
CO725358 Couture Creations Heat Activated Foil - Blue Foil Mirror Finish
ULT200001 Snow White Cardstock
ULT200030 Caruso Cardstock
ULT2200067 Garnet Cardstock
CO724156 Crystal Gemstones
CO721979 Red Glitzin' Glamour

