Hello all and welcome back to Couture Creations Design Team blog , Lee-Anne here
this time with an easy Thank you greeting card.
For instructions on how to make up this Card, please can you watch my video here:
I made this greeting Card using the
Couture Creations Butterfly Garden paper collection,
Butterfly Garden Ephemera collection,
Couture Creations mini guillotine
Chocolate Heat Activated foil
Chocolate Heat Activated foil
Couture Creations Go Press and Foil and
Go Cut and Emboss machines.
For this project you will need: plain white card for a folded white card measuring 21cmx10.5cm, score at 10.5 and fold in half.
Cut plain brown card to 15cmx10cm for the matt,
cut the yellow card to 14.5cmx9.5cm for a 2ndmatt,
cut the 02A pattern card to 8.5cmx14cm,
cut a thin strip from the 12B paper to 14cmx2cm,
the mini flower bouget from ephemera collection,
15cmx1cm soft thin cream gauze folded into a bow.
cut the yellow card to 14.5cmx9.5cm for a 2ndmatt,
cut the 02A pattern card to 8.5cmx14cm,
cut a thin strip from the 12B paper to 14cmx2cm,
the mini flower bouget from ephemera collection,
15cmx1cm soft thin cream gauze folded into a bow.
Two mini leaves, mini flowers, 2 or 3 different stamens, multiple mini Bee die cuts using different coloured card, wooden flower, wooden "Thank You" sentiment,
6 x mini copper diamante.
6 x mini copper diamante.
For fun and an optional layer, I use gold angel hair (which I got from a florist supplier). Foam strips and foam dots for the raised mounting and a mini postcard from the paper collection.
To start, turn on your Go Press and Foil Machine on to warm up and get ready for foiling later in the project. Place the metal plate onto the heating plate, close the lid and tap the red light to heat up machine.
Trim and fold the white card, stick down the brown matt card to the card front. Stick the yellow card to the brown matt. Stick the 12B mini strip with the strips down the left hand side of the card. Using the 02A pattern page, stamp the mini Bees to the left of card just below where the sentiment will go.
Flip over and secure the black foam strips to the back and stick onto the card front just to the right of the stripy piece. Using the mini flower bouget, flip over and secure the foam dots and stick onto the front of the card slightly overlapping the stripy strip.
Using strong glue, stick the folded bow and angel hair at the bottom of the flower bouget. Tuck and stick the mini leaves underneath the bow trim.
Cut the stamens in half and randomly secure underneath the bow ensuring that they will just be visible once the flower is stuck down.
Stick the flower over the angel hair just below the knot of the bow.
Stick down the little mini post card peeping out from the top right hand corner of your flower.
Stick the multiple Bee die cuts on top of each other, also overlapping the top of the mini postcard.
Using your Go Press and Foil Machine should be warm and the green light should be flashing. Using the wooden flower and the pearlescent Heat activated foil, place the foil with the colour side facing down on the metal plate.
Place the wooden flower on top of the foil, also facing down, then add a scrap piece of paper to cover the foil and wooden flower to make sure that the foil is not also transferred to the lid of your machine.


Remove the Go Press and Foil plate and slowly run through your Go Cut and Emboss Machine. Once foiled, open lid and carefully remove the wooden flower that has now been beautifully embossed with the foil.
Replace the Go Press and Foil Machine back onto the heating pad to heat up again.
Cut the foiled flower in half.
Using strong glue, stick one half of the wooden flower on the left just below the bouget flower and bow, making sure that the flower is just peeping out from behind the flower.
Stick the remaining piece of wooden flower on the right just above the ephemera Bouget also making sure that it is just peeping out from behind the bouget.
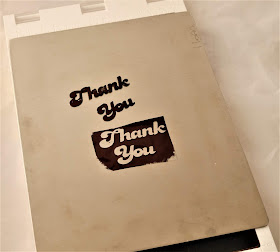
Place the dark brown Heat activated foil onto the metal plate with the coloured side facing down, place the wooden sentiment into the foil, making sure that the wording is facing down and the right way.
Place a piece of scrap paper over both and when the green light is once again flashing on your machine, remove from the heating pad and slowly run through your Go Cut and Emboss Machine.


Once done, remove the sentiment, however don’t discard the used foiled piece and you can reuse this to create a second sentiment from a scrap piece of card. To do this, place a piece of white card onto the metal plate of your foiling machine, then place the foiled sentiment face down onto the card, add a piece of scrap paper covering both and slowly run through your Go Cut and Emboss Machine.
Once foiled, remove and set aside to use on another project.
Stick the Thank You sentiment just off the top left of the card.
To finish off the card, add mini copper diamante.
Congratulations, here is the finished Thank You greeting card.
Couture Creations Products:
C0726532 12 x 12 Paper - Butterfly Garden - Double Sided Sheet 02A &12B
C0726540 Butterfly Garden ephemera
C0724824 Go Cut and Emboss Machine
C0725032 Go Press and Foil Machine
CO725702 Chocolate Heat Activated foil
CO725702 Chocolate Heat Activated foil
C0726343 Couture Creations - Mini Guillotine Trimmer
C0726342 Couture Creations - Scoring Board
C0726430 Self Adhesive Black Foam Strips
C0726428 Self Adhesive Black Foam Dots
C0726557 Butterfly Garden Buzzing Bees Mini stamp
Enjoy!
Lea-Anne Alexander

#couturecreationsaus


