Introducing Crece - Guest Creative
Today, we would like to introduce Crece Thomas as our Guest Creative.
Please pop in and say Hi, to Crece and give her a warm welcome.
Here's a little bit about Crece:
Hi everyone, I'm Crece and I live in Ipswich,Queensland,Australia.
I’m an online craft store owner, wife and mum to 2 boys.
I first discovered the love of papercrafting back in 2008 and I quickly developed a passion to express creatively through my work.
I have been a design team member for some Aussie crafting companies which has allowed me to teach and do instore and craft show demonstrations, and have also contributed to online challenge blogs and have been lucky enough to have some of my work published in magazines.
I would describe my style as Clean, strong design elements, with unique controlled mixed media pops!
As well as scrapbooking I also enjoy card making and off the page projects.
Here is a Mini Flip-Out Album created by Crece.
Hi Everyone, Crece here today to share a little inspiration with you. I have made a Mini Flip out Album Card with the new release range Merry Little Christmas from Couture Creations. I will provide you with step by step instructions so you can play along at home.
Step By Step Instructions
- Score a 12 x 12 Piece of Cardstock at 3 1⁄2”, 4", 8", and 8 1⁄2”. Rotate the paper 90 degrees to the left and score again at 3" and 7 1⁄2”.
Cut out according to sketch. (ignore the shapes of the top flaps for now)
2.Cut Merry Little Christmas paper #02 (Holly pattern Side) – on the bottom left of the paper 3 3/8inches wide x 4 ¼ inches high, do the same again from the bottom right. Ink all edges using Grass Green Dye Ink CDEIPU021 throughout this project. Using double sided tape attach to the bottom left and right of 12 x 12 paper from Step 1.
3. Cut paper #4 (poinsettia side) 3 3/4inches wide x 4 ¼ inches height. Cut Paper #5 (the border strip of berries) 5 inches wide. Along the back of the Border strip apply tape along the bottom and sides. We are going to make a little pocket. Pull the backing off the tape for the base of the pocket and line it up to the bottom of the 3 3/8inch side of paper #4. Peel backing tape from the sides and fold over to create a pocket. Place tape on the back of paper #4 and attach to the bottom middle of the 12x12 paper.
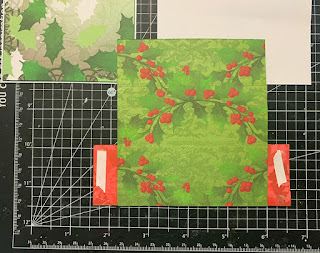
4. Cut 2 x 3 3/8inches x 4 ¼ inches from Paper #4 (wreath side)Cut 2 5 inches x 1 ½ inches from Paper #05 (red side). Follow the steps like before to create a pocket, only this time they will be on the left an right sides. (see photo below)
5. We are now going to make a double pocket for the centre sectionCut Paper #3 3 ¾ inches wide x 4 ¼ inches height. Cut Paper #2 1 ¾ Inches x 5 inches, and attach to the paper you just cut. Cut out the ‘Merry Christmas’ from Paper #6 (bottom right of page) place tape on the back along the bottom and sides and attach to the top of the first pocket you have just created.
6. Cut 2 2 ¾inches x 3 3/8inches from Paper #4 (poinsettia side) and attach to top left and right flaps.Cut 2 ¾ inches x 3 ¾ from Paper #02 and attach to top middle flap.
7. Flip bottom flaps up. We are now going to cover the other side them. Cut 2 of 3 3/8inches x 4 ¼ inches from Paper #3 and attach to the left and right flap. Cut 2 of 3 3/8 inches x 4 ¼ inches from Paper #6 (Green Side) Cut each piece to make 2 triangles (so you will end up with 4 but we will only use 2) These will be some more pockets. Attach tape along the longest edge and the bottom edge and attach to paper.
8. Cut Paper #6 (Green Side) 3 ¾inches x 4 ¼ inches and attach to centre flap. Cut Paper #5 (Red Side) 3 inches across x 4 ¼ inches high and centre on top of green paper. Cut out Santa image from Paper #6 and stick down to the bottom right of flap.
9. Flip top flaps over and cover the top left and right with Paper #02 Cut 2 2 ¾inches x 3 3/8inches and attach to flap. Cut Paper #2 (Red Side) 2 inches x , ¾ inches and attach to top of flap. Cut Poinsettia Border trim from paper #5 to 3 ¾ inches wide and stick down to the bottom part of the flap. Cut left and right flaps on an angle by measuring from the corner tip down an inch to the opposite side. Trim middle flap on both sides (see below image)
10. Fold right edge of Mini Album over. Cover using Paper #2 3 3/8 inches x 4 ¼ inches and stick down.
11. Fold again to see the Back of the Album. Cut Paper #3 3 ¾ inches x 4 ¼ inches and stick down.
12. The front cover. Cut Paper #4 3 3/8 inches x 4 ¼ inches and stick down. Cut out Bow from Paper #1, using Foam mounting tape attach Bow to the top half of the cover. Cut Out ‘Merry Christmas’ from Paper #6 (left side middle) Using Foam mounting tape and attach to the bottom part of the cover. Ink all the edges of the card-stock and you are done!
COUTURE CREATIONS PRODUCTS:
C0726342 Scoring Board 12 x 12
CO727945 Merry Little Christmas 12 x 12 Paper Pack
ULT200001 12 x 12 Ultimate Crafts Snow White Cardstock
CDEIPU021 Card Deco Essentials Fade-Resistant Dye Ink Grass Green
CO721985 Double Sided Tape - Standard 6mm x 50m
#couturecreationsaus


0 comments