Anita EnrightCardsChipboardDecorative DiesDesign Team 2015EphemeraLaceMagnolia LanePaper FlowersPaper PadsStampsUltimate CraftsUltimate Crafts Cardstock
Magnolia Lane Shutter Tri-fold Card by Anita Enright
#couturecreationsaus #ultimatecrafts
Hi Everyone, Anita here with you again today on the blog.
For my 2nd February post I decided to do a card that I had never endeavoured to do before and I am very happy with the result. Of course the beautiful papers and embellishments that I used from the Magnolia Lane collection made it ever so more amazing.
My finished card ended up being 6" x 6" when folded closed.
To start I chose the gorgeous Ultimate Crafts cardstock in Charming and cut it a piece 6" x 12".
Below is a picture of how the scoring and cutting was done on the card stock.
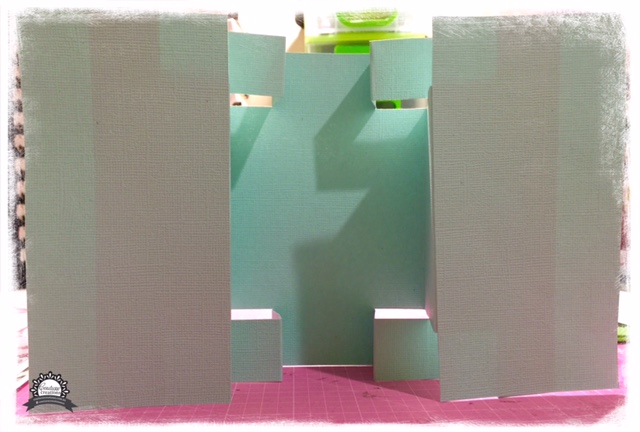
Once you have done your scoring the vertical lines and cutting the four horizontal lines you can fold along the score lines. The best way to do this is to start at the two inside long score lines (at 4" and 8") as these both need to be valley folds, this makes the very back of the folded card. Working your way to the outside the long 2" and 10" are peak folds. Below is a photo of the finished folds for your to match your card to. A better example is further down showing from the top.
Next cut two 3" x 6" in the same coloured cardstock. These get attached to the front of the card mat with the inner edges of your 3"x6" piece on the 1st fold line on each side of the card. When folded flat this makes the card 6"x6".
On the two large side panels I just attached the Pandora coloured cardstock and then added a strip of black lace to each side. All of the forward facing pieces I have used both the pink cardstock matted behind a patterned paper. Patterened paper used on the small pieces were Floral Fancy and Pretty Patches. For the large back inside area I used the Rosehip Memories.
Once I had all my patterened papers in place I attached a 4 1/2" x 4 1/2" card to the centre reverse of the card to put my sentiment.
Finally I added heaps of the chipboard and ephemera and my favourite die, the Drifitng Feather to the front. Add a scattering of the 3mm pearls to highlight specific areas of your choice.
Check out the close ups of the finished project.
PRODUCTS USED
CO724635 - Couture Creations - 3mm pearls - Pretty Pink
ULT200020 - Ultimate Crafts Cardstock - Charming
ULT200007 - Ultimate Crafts Cardstock - Obsidian
ULT200082 - Ultimate Crafts Cardstock - Pandora
ULT157486 - Ultimate Crafts - Magnolia Lane 6"x6" Paper Pad
ULT157508 Ultimate Crafts - Magnolia Lane Paper Magnolias
ULT157507 - Ultimate Crafts - Magnolia Lane Black Lace
ULT157516 - Ultimate Crafts - Magnolia Lane Adhesive Chipboard
ULT157515 - Ultimate Crafts - Magnolia Lane Diecut Ephemera
ULT157525 - Ultimate Crafts - Magnolia Lane - Drifting Feather Decorative Die
ULT157510 - Ultimate Crafts - Magnolia Lane - Timeless Garden Stamp Set
CO721985 - Couture Creations - 6mm Double Sided Adhesive Tape
Until next time, Happy Crafting :)
Anita


5 comments