3D Card with Envelope Box by Michelle
Hello and welcome to all our Couture Creations crafty friends around the world.
I'm back.
I've been creating and it's now my turn to share and hopefully you in turn will disappear into your crafty space and be a little creative.
Here we go.
Note - this post is a little photo heavy and I do apologise in advance - the technology gremlins have been visiting me and all sorts of strange things have been happening. Technology at times can be so frustrating - far better to spend time being crafty ... just saying.
Today I am sharing a card and an envelope box.
I can tell you that the Couture Creations scoring board makes making envelope boxes a breeze - it truly does. The base of my envelope box took only a few minutes - the decorating and embellishing, well that took just a little bit longer.
Card
White cardstock cut 10.5" wide x 3.5" - scored as per photo.
Afterwards I trimmed a smidgeon off the left hand side panel and the far right hand side panel - so that when it folds up, it closes neatly.
Cut green cardstock and Le Petit Jardin papers
for each panel of your card.
Using rub-ons or stamps add birthday sentiments to each panel.
The envelope box
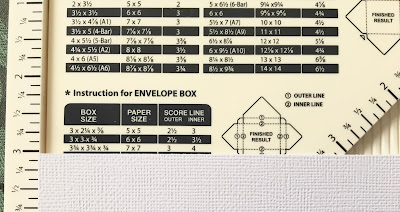
Cardstock 7" x 7".
You can see on the instructions above using 7" x 7" that you score on the 3" and 4" mark.
Plain white envelope box prior to embellishing and decorating.
Cut green cardstock strips for side panels and two panels for top and bottom of envelope box.
Cut patterned paper panel for top of envelope box.
Cut decorative corner die from white cardstock and adhere to cardstock flap. [Tip - glue pen makes adhering scrolls, filigree die pieces a breeze].
Cut doily and butterflies and adhere to the top of the flap - this helps keep the flap weighted and closed.
Adhere fibres and muslin and build embellishment cluster.
Randomly apply gesso and art stones to finish.
Materials list :
Elegant film strip die
Foliage die
Butterfly
Until next time, happy crafting.
Michelle [aka Mrs Frizz]


0 comments