#couturecreationsaus #gentlemansemporium#thelittlethings #anetvanzyl #scrapbookinglayoutLea-Anne Alexander
The Fitter Boys - Scrapbooking Layout with Lea-Anne
Hello All,
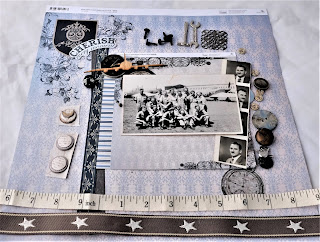
This time we will make this scrapbook page layout using a photo from my Dad’s training days at 68 Air School.
I made this scrapbook layout using the Couture Creations Gentlemen’s Emporium paper collection, the Gentlemen’s Emporium Ephemera collection and the Couture Creations mini guillotine.
For instructions on how to make up this layout, please can you watch my video here:
For this project you will need: Jumbo photo, the 07A page from the Gentleman Emporium collection, the Cherish the Moment sentiment, 2 x pattern strips and clock from the Ephemera Collection. The 01A and 05B pages from the 6x6 paper pad. 1x 30cmx30cm charcoal card stock and 1 x 30cmx30cm navy card stock. 2x 11cmx5.5cm black gauze, 1 x 10cmx4.5cm grey mesh. A wooden aeroplane die cut, buttons, old watch face, metal finding, metal wrench charm. Metal washers and star cotton ribbon. Foam dots and foam strips, distress inks and blue micro beads (optional) and blue glitter (optional). Detailed stencil, black gesso/gloss gel medium and palette knife.
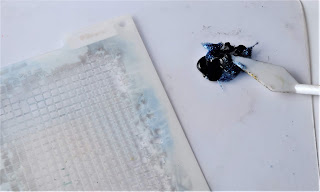
Using your stencil, the black gesso (if you don’t have black gesso, substitute with black distress ink and gloss gel medium or modelling paste) blend together on your craft mat. I had some blue glitter glue lying around that I added to the mixture. Using the 07A page, place the stencil just off the top left hand corner and blend the gesso through the stencil. Clean the stencil and repeat just off the bottom right corner of the page. Clean you stencil and palette knife. While the Gesso or gel medium is still wet, sprinkle with the blue micro beads over the gesso, tap off excess beads and set the page aside to dry. I left my page to dry overnight.
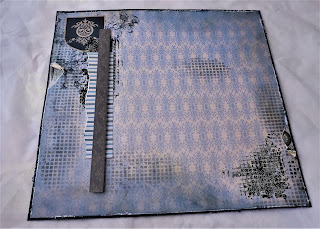
Once your page is dry, use your stencil again blend the grey distress ink randomly blend around the page. Using the blue, grey and black distress ink, blend around the edges of the page. Using your scissors or a distress tool, rough up the edges of your pattern sheet. Tear the page slightly just off the bottom left corner and top right corner. Using the 6x6 01A page cut a strip with the clock image and secure behind your tear. Using the 6x6 01A page cut a strip showing the pen point and secure behind your tear at the top right of the page. Cut your grey card stock to 30cmx30xcm. Cut your pattern sheet to 29.5cm x29.5cm and stick down onto the grey card stock.
Tear off a strip from the 01A page showing the strips and stick just below the emblem at the top left of the page. Using the grey pattern strip from the ephemera collection, trim and stick down overlapping the stripped strip. Repeat using the blue pattern strip and stick down overlapping the grey strip. At the top left, trim and stick the black gauze underneath both strips.
Using your photo, trim and mat onto dark blue card. Raise the photo stack with foam strips behind the grey matting. Rough up the edges, and stick down onto the grey card. Rough up the edges of the grey card. Tear off a strip from the 6x6 01A page showing the stripes and stick down underneath the grey card popped out from behind your photo stack. To create the pocket for your journaling tag, stick down the photo matting only securing along the bottom, far left and far right edges of the photo matt. Keep the top of the photo matt open for your journal tag
Using the pre-printed journaling card, make up the tag by matting to the blue card. Trim and secure two pieces of the star cotton ribbon at the top of the tag to use to pull the tag out. Matt to the grey card. Set aside.
Using the 2nd piece of black gauze, secure just underneath the top right of your photo. Repeat with the grey gauze at the bottom left of your photo with glue on the left edge underneath the strips.
For my layout title, I used the note that my Dad had written on the back of this photo so many years ago. Trim the star cotton ribbon in two pieces and secure underneath the title at the bottom right of the page. Rough up the edges of the blue card and matt the title to the blue card. Stick to the layout, just underneath your photo and to the right of the grey gauze.
Using the emblem from 68 Air School, trim and matt onto blue card, rough up the edges and matt to the grey card, rough up the edges and stick all down overlapping the emblem at the top left of the page overlapping the strips stuck down earlier. Using the photo strip of my Dad, stick down onto blue card, rough up edges and stick down, at an angle, across the emblem and the photo.
Using 6x6 05B page, fussy cut the clock and stick down overlapping the bottom corner. Repeat using the clock from the Ephemera collection and stick down underneath the blue strip and the emblem at the top left of the page. Using your buttons, add to the bottom right hand corner. Add the metal washers and buttons to the bottom right corner of your photo. Break down the old watch and stick the watch mechanism on top of one of the washers.
At the bottom left of the page, add the buttons, snip the metal finding in half, and stick down at the bottom left of the photo strip with the Dad pin. Stick the back of the watch and the other half of the metal finding underneath the top right of the photo. Stick the wooden aeroplane die cut above the photo in the open area.
Using the old watch face, stick down overlapping the big clock die cut. Add the metal wrench charm just underneath the photo strip. Finish off by adding the remaining mini buttons. Tuck your journaling tag behind your photo.
Congratulations, herewith your finished Gentle Emporium scrapbooking layout.
For instructions on how to make up this layout, please can you watch my video here:
Products used:
C0726821 12 x 12 Paper – Gentleman’s Emporium - Double Sided Sheet 07A
C0726820 06 x 06 Paper – Gentleman’s Emporium - Double Sided Sheet 01A and 05B
C0726826 – Gentleman’s Emporium Die cut Ephemera Set
C0726343 Couture Creations - Mini Guillotine Trimmer
C0726430 Self Adhesive Black Foam Strips
C0726428 Self-Adhesive Black foam dots
Enjoy!
Lea-Anne Alexander
Facebook: @artandcraftcards
#artdecocreations #couturecreationsaus #ultimatecrafts


0 comments