AdhesiveAnita EnrightAnna GriffinCardsDecorative DiesDesign Team 2016/2017GoCut and Emboss MachinePaper FlowersSea BreezeStencils
Pinks and blues... and Seashells too by Anita Enright
#couturecreationsaus #ultimatecrafts
Hi Everyone, Anita here with you on the blog today sharing a card that I created using the Sea Breeze papers and dies, teamed up with some of the beautiful flowers and using one of the Anna Griffin range of stencils designed for Couture Creations.
Have you tried the new Couture Creations card bases yet? They are wonderful. It is great that you get prescored card bases and matching envelopes in a set of 50. There are several different sizes and colours to choose from, white, cream and kraft, square rectangle and long.
For this card I used one of the white square card bases.
I selected two matching prints from the 6" paper pad, A Windy Beach and Deep Seas and Whirling Winds.
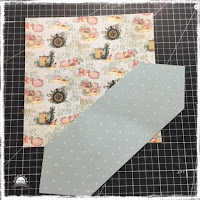
Cut down the Deep Seas and Whirling Winds paper to just slightly smaller than the card base and distress the edges. With the A Windy Beach piece cut off opposing corners of the paper and distress the edges. See my picture below.
Next cut out two of the Sandy Border dies using a coordinating peachy pink cardstock to match.
I have just gotten hold permanently of one of the new Couture Creations Go Cut and Emboss machines. Oh my goodness!!! They are just so beautiful to work with. The cut on it with the dies is phenomenal. It is so light and now takes pride and place on my craft desk.
.
Attach
the spot paper now with the dies adhered to it on to the square
patterned paper. See below. Once adhered trim off the excess of the
Sandy Border that overhang the edges. Then adhere to the card base
Next, I took my Anna Griffin stencil, Arabesquie, and with some texture paste add some elements to the corners of the spotted paper. I had some matching coloured texture paste in my stash but if you only have white you can colour it with our Couture Creations Anna Griffin Pigments (arriving soon). Set it aside to dry.
I then took one of my Cottage Pollen large flowers and four of the small 3cm Tie Dyed and Jewelled Florettes flowers and inked them in matching colours. For the large Cottage Pollen flower I used both a teal ink for the edges and a salmon/peach pink for the centre. For the small Tie Dyed and Jewelled Florettes I inked the edges in the teal ink. I then totally soaked the flowers in a pearlised mist so that the inks soften and they got a gorgeous finish to them. To speed the drying process up I blasted them with my head gun. You will see how lovely they look in the closeup photos. I also grabbed a couple of other flowers from my stash and inked them in the salmon/peach ink and used the pearlised mist on them too.
To finish the card I added the flowers in between the two stenciled accents and added a couple of white sprays in amongst the flowers and I was done.
When making my cards now I hold off with a sentiment on the front until I have the need to use it for someone. I then have a myriad of cards to chose from and only need to put a fitting sentiment on the front.
Couture Creations Products Used
Thanks for stopping by
Don't forget to follow the Artdeco Creations Blog and also follow Couture Creations|Ultimate Crafts onFacebook, Pinterest, Instagram and Twitter
Until next time..... keep creating
Anita
xx


4 comments