
Jumping Boxes with Shobi
Hello Everyone,
I am back today with another fun project – jumping cubes housed in a tray/drawer card box.
It looks so pretty decorated with the beautiful Peaceful Peonies collection.
This gift will wow your recipient!

To construct the cube, you will need strong card stock, hole punch, glue,
rubber bands, scissors and a 12 x 12 Scoring Board.

Cut card stock to 5⅞ x 7¾.

Score 3⅞ on 7¾ length.

Rotate to diagonally score at 3¼, 6 and 8¾.

Rotate 180˚ to diagonally score at 3¼, 6 and 8¾.

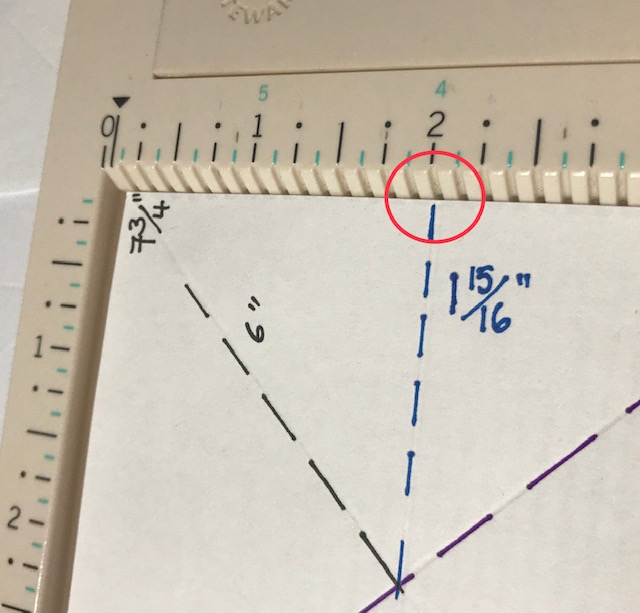
On the short 5⅞ length, score at 1 15/16”. This is just shy of 2” so I shift the card stock a smidgen to the right.

Cut away blue shaded area.

You’ll need 2 of these to build 1 cube. Repeat step 1-6 for your second card stock.


To make the tab for the rubber band to hook onto, fold at 3⅞” score line and punch a hole through the 2 layers. (image 11 and 12).
Cut a slit to the hole through the 2 layers. This will allow rubber band to slide into the hole at assembly.
Cut a slit to the hole through the 2 layers. This will allow rubber band to slide into the hole at assembly.

Valley fold at 1 15/16” and 3⅞”.

These are valley folds if looking from box exterior. Mountain fold the remaining score lines. Burnish well.

Repeat step 8 and 9 for your second card stock.

Apply glue to area A and this should valley fold together.

Glue area B together. You should be able to see a diagonal half of your cube forming.
Repeat this step for your second card stock.

While areas A and B are both on the same card stock, area C is used to connect the 2 halves together.
Glue one area C to the other half.
Allow this glue to dry well.
Glue one area C to the other half.
Allow this glue to dry well.
Hook rubber band into the holes.
This step is a bit awkward to work with as the rubber band is creating some tension.
This step is a bit awkward to work with as the rubber band is creating some tension.

Once rubber band is in place, apply glue the other area C to attach the 2 halves together. Press firmly until glue is set or consider using some bull clips.
Hopefully you could follow me all the way here!
All you need is to decorate your jumping box with the
beautiful Peaceful Peonies Collection Double sided papers.
Top tip: I used 2 alcohol inks to create the ombre effect on white glitter card before die cutting “Just for you”.
All you need is to decorate your jumping box with the
beautiful Peaceful Peonies Collection Double sided papers.
Top tip: I used 2 alcohol inks to create the ombre effect on white glitter card before die cutting “Just for you”.

The decorated cubes sit flat in a simple tray/drawer box and when the box is opened,
the cubes jump to life and pop out.
Here’s short slow-motion video showing the cubes jumping out of the box.
Video Link:
https://www.youtube.com/watch?v=TdjjJ-RDAzc&feature=emb_logo
the cubes jump to life and pop out.
Here’s short slow-motion video showing the cubes jumping out of the box.
Video Link:
https://www.youtube.com/watch?v=TdjjJ-RDAzc&feature=emb_logo

Items used in this Project from the Peaceful Peonies Collection are listed below:
CO727350 - Collection Pack - 12 x 12 - Peaceful Peonies - (12 Papers, Stickers and Postcards)
CO727415 - Cut, Foil & Emboss Die- Peaceful Peonies - Spotted Butterfly (1pc)
CO727226 - Mini Die - Sunburnt Country - Butterfly
CO727385 - Die - Peaceful Peonies - Framed Fleur De Lis Set (2pc)
CO727350 - Collection Pack - 12 x 12 - Peaceful Peonies - (12 Papers, Stickers and Postcards)
CO727415 - Cut, Foil & Emboss Die- Peaceful Peonies - Spotted Butterfly (1pc)
CO727226 - Mini Die - Sunburnt Country - Butterfly
CO727385 - Die - Peaceful Peonies - Framed Fleur De Lis Set (2pc)
I hope you like this fun project as much as I do.
Until next time, keep crafting!
Shobi


0 comments