Twist Easel Card with Michelle
Hi everyone and welcome back,
Today let me share with you a card using My Secret Love, with a twist and an easel.
Yes, you read that right.
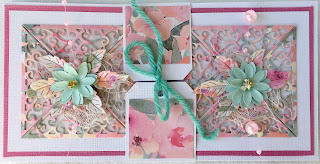
This is what my card looks like closed - and I have made a belly band to keep it closed and it is relatively flat for posting.
Now that doesn't happy very often with my cards as I really do love making lumpy, bumpy cards.
And here it is standing in all its glory ...
They really are quick and easy to make - promise.
Cut a piece of cardstock 8" square.
Score in half from left to right.
Now at 4" cut down to the middle of your score line.
Score on the left hand side from the edge into the middle where your cut line and score line meets and then score it again, from the top right hand side edge down to the middle where the cut line and score lines meet.
Have a look at the next photo if you are a little unsure - now it should all make sense.
Fold the top left hand side in half diagonally and apply wet glue - I use wet glue here so that I can manoeuvre the next step.
Cut two pieces of 4" square piece of cardstock and glue one to the left hand side and one to the right hand side.
The diagonal piece that you see in the photo below then becomes the swing piece that twists - does that make sense.
Now when you flick it back to close it - when you are look at it shut, it sits flat.
Now to decorate and embellish.
You treat each 4" square panel separately and cut two separate pieces of cardstock and layer building your layers up.
My base cardstock is white, then first layer pink and then next layer is white. I have then cut a square lace patterned shaped doily using the gorgeous papers from My Secret Love collection. Adhered a little muslin, some crafting fibres, a little foliage and then added a thread of pearls and a small bloom.
NOTE : when you make a twisted easel card you need to remember that looking at your panels flat and in front of you whilst the card is closed it will look differently when you are card is opened and on display.
Do not get caught out adhering sentiments to a closed flat card, as when you do the twist and leave your card opened and on display, the sentiments will not sit straight - you need to keep this in mind too if you are using different patterned papers.
I know this how ... because it happened to me ... trust me on this one.
When you lift both lids [for want of a better term] you can then decorate the inside of the card with a similar layering colour scheme and then add a sentiment - I have added a layer of chipboard underneath to make it sturdy and give a little height as when the easel card twist panels are open, they balance themselves open depending on where and how you have added your sentiment panel.
Here's your left hand side panel.
Here's your right hand side panel.
And now to keep your card closed whilst in transit or the gifting stage with its belly band.
See how when it is closed the pearls are going from top to bottom of each of the panels.
When the card is open, the twist of the easel card is open, the pearls run from left to right.
Materials used :
CO727591 - My Secret Love double sided patterned paper 3
CO727595 - My Secret Love double sided patterned paper 7
CO726342 - 12" scoreboard
CO726520 - Go Power and Emboss machine
CO721985 - double sided tape
ULT200001 - white cardstock - 12" x 12" - Snow White
Happy creating everyone,
Until next time,
Michelle [aka Mrs Frizz]
#couturecreationsaus


0 comments