
Design Team 2015EmbellishmentsLaceMagnolia LanePaper PadsScrapbookingStampsTracey RohwederUltimate CraftsUltimate Crafts Cardstock
Timeless Memories of You by Tracey Rohweder
#couturecreationsaus #ultimatecrafts
Hello crafty friends!
Thanks for stopping by the Couture Creations Blog today.
I was beyond excited to use the newest release, Ultimate Crafts Magnolia Lane .
Sue Smyth has designed such a gorgeous collection - you're going to find it hard not to want all of it! The colours & patterns are so pretty, and all the matching embellishments make this a must have in your stash.
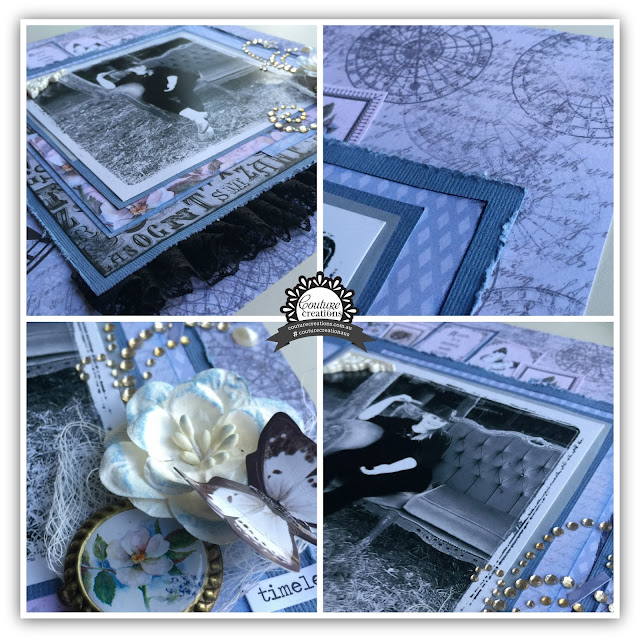
So let's get crafting! When I first looked through the papers, this blue clock & script paper kept catching my eye. So that was the perfect place to start. My gorgeous Miss 12 isn't a real girly girl (she actually isn't that fond of pink!) so the blues matched her & her personality perfectly.

Starting with the 12x12 piece Timeless Garden (from the 12x12 paper pad) I've stamped the round map from the Timeless Garden 4x6 inch Stamp set multiple times in a light grey ink down the right hand side of the paper.


 ** TIP **
One of my favourite adhesives are the 3D Foam Dots. So what do you do with the left over backing once you finished the packet? You use it! It's PERFECT to use as mounting! I just cut the size i want and use it as a mount (it's super for larger pieces). You use it exactly as you'd use your foam dots. Remove the backing piece from one side, place down, and the remove the other side.
And best of all you have just got more for your dollar from something you'd normally throw away.
** TIP **
One of my favourite adhesives are the 3D Foam Dots. So what do you do with the left over backing once you finished the packet? You use it! It's PERFECT to use as mounting! I just cut the size i want and use it as a mount (it's super for larger pieces). You use it exactly as you'd use your foam dots. Remove the backing piece from one side, place down, and the remove the other side.
And best of all you have just got more for your dollar from something you'd normally throw away.
 After adding the mounting foam for height, I've placed a piece of 18mm doubled side tape along the bottom of the cardstock. Along this I've pleated roughly a piece of the black lace. To ensure that the lace is secured I've put another piece of the 18mm tape on the top which will attach the lace to the layout.
 The mounted photo with lace is then placed on the layout in the lower right hand corner.
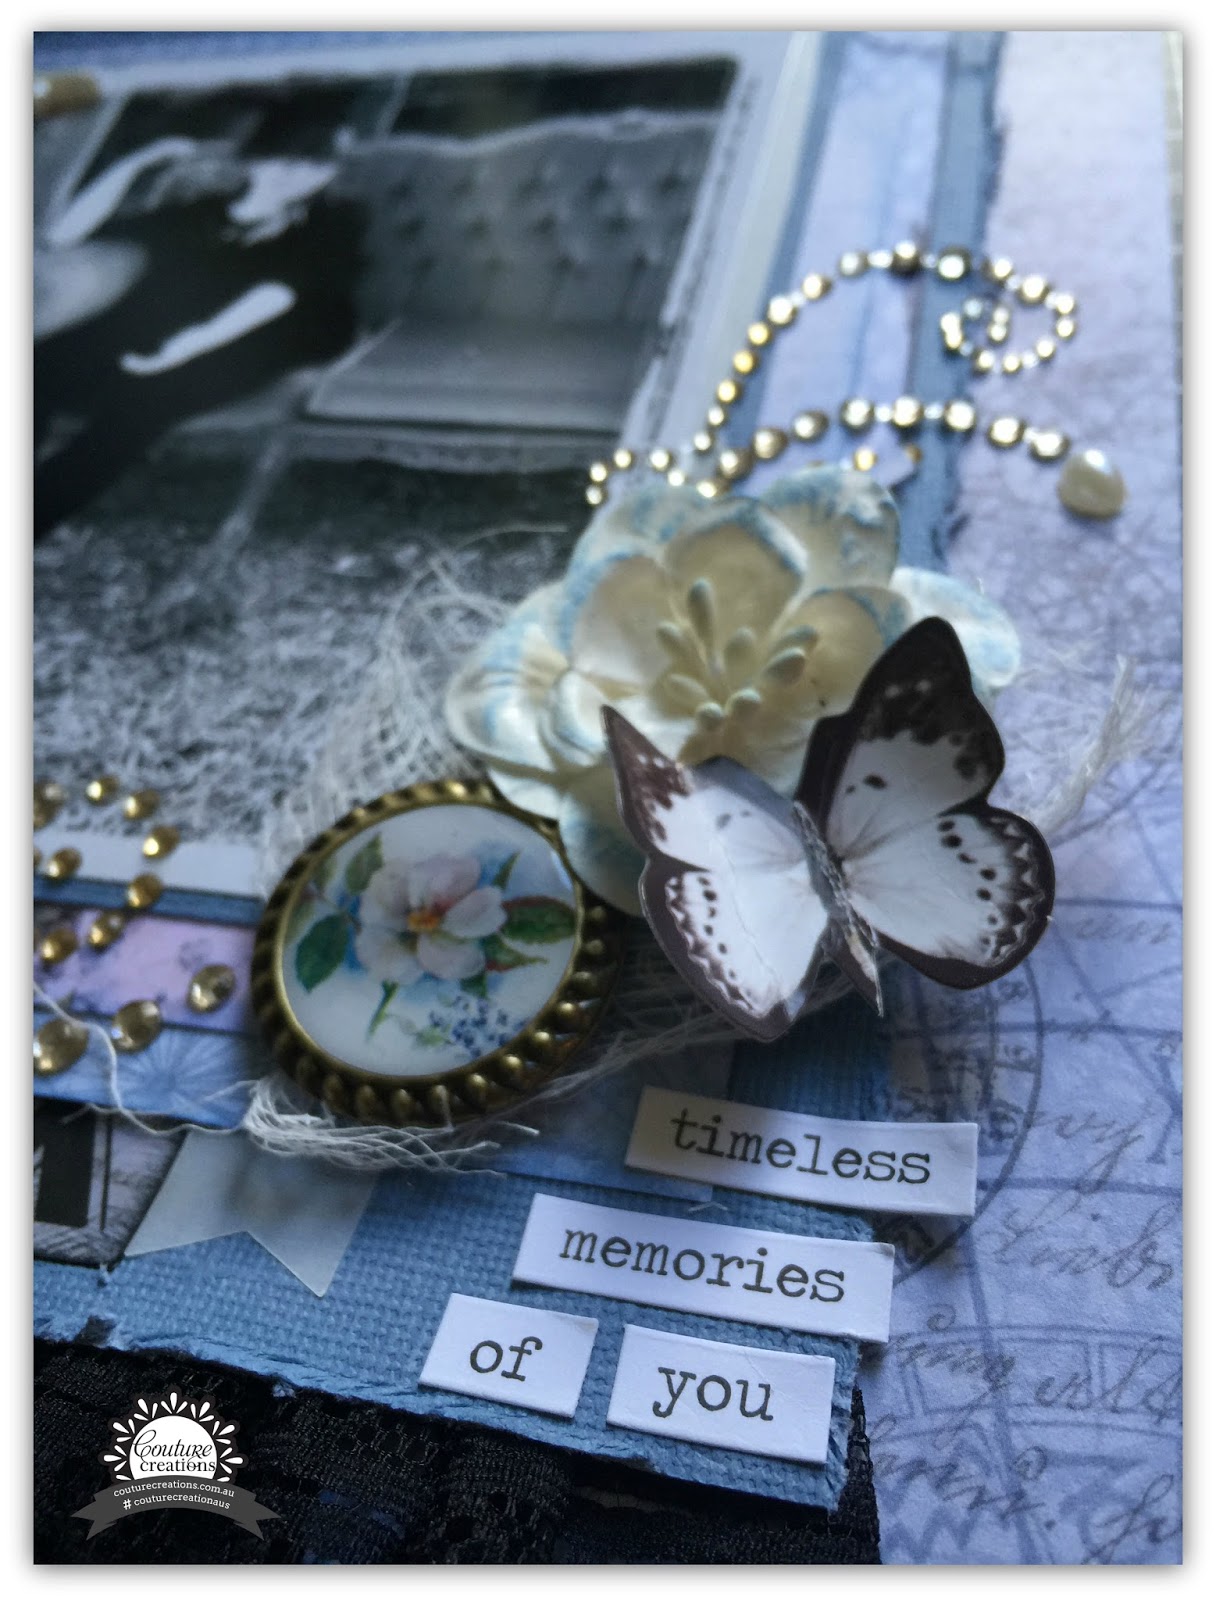
 The Bling Flourishes with Pearls in this collection are just gorgeous! So to get as much use as possible I've cut them, and only used a portion of each flourish - use your product how you want!
 In the bottom right hand corner of the photo I've added 3 embellishments on top of some gauze (a butterfly from the Ephemera pack, a metal trinket and a paper magnolia) attaching these with 3D Foam dots. On each of the embellishment cluster side I've placed the bling flourishes.

 Along the top of the photo mat I've tucked some cut aparts from a piece of the 6x6 Paper Pad, using 6mm double sided tape on the back.
 Finally I've added a Resin Frame to the top left corner of the photo.

 And we're done.

I adore this beautiful Magnolia Lane collection. I can't wait to create more projects and share with you. Have a wonderful day.
Until next time!
Be sure to check the Couture Creations Blog to be inspired
Thanks for stopping by the Couture Creations Blog today.
I was beyond excited to use the newest release, Ultimate Crafts Magnolia Lane .
Sue Smyth has designed such a gorgeous collection - you're going to find it hard not to want all of it! The colours & patterns are so pretty, and all the matching embellishments make this a must have in your stash.
So let's get crafting! When I first looked through the papers, this blue clock & script paper kept catching my eye. So that was the perfect place to start. My gorgeous Miss 12 isn't a real girly girl (she actually isn't that fond of pink!) so the blues matched her & her personality perfectly.

Starting with the 12x12 piece Timeless Garden (from the 12x12 paper pad) I've stamped the round map from the Timeless Garden 4x6 inch Stamp set multiple times in a light grey ink down the right hand side of the paper.


Next I've mounted my photo on matching Ultimate Crafts card stock, and then added different and random sizes of patterned paper cut from the Magnolia Lane 6x6 paper pad. I've also inked around the patterned paper edges for contrast.

Once I was happy with the position of the patterned papers I've stuck them down using 6mm double sided tape. I've then matted the photo and patterned papers onto another piece of the blue cardstock, and distressed around the edges with my non-stick scissors.


I adore this beautiful Magnolia Lane collection. I can't wait to create more projects and share with you. Have a wonderful day.
Until next time!
Be sure to check the Couture Creations Blog to be inspired
by the amazing ladies on the Design Team.
You can also follow Couture Creations on
Couture Creations Products Used
ULT157493 12x12 Paper Magnolia Lane, Timeless Garden
ULT157486 Magnolia Lane, 6x6 Paper Pad
ULT157510 Magnolia Lane 4x6 Stamp Set, Timeless Garden
ULT157508 Magnolia Lane Embellishments, Paper Magnolias
ULT157507 Magnolia Lane Embellishments, Black Lace
ULT157500 Magnolia Lane Embellishments, Metal Trinkets
ULT157501 Magnolia Lane Embellishments, Resin Frames
ULT157499 Magnolia Lane Embellishments, Bling Flourishes with Pearls
CO721955, Pointed Non-stick Scissors 14cm
CO721985 6mm Double Sided Tape
CO72196518mm Double sided Tape
CO723780 3D Foam Adhesive, 3D Mini Foam Dots
CO721957 15"x15" Self Healing Mat
CO723780 3D Foam Adhesive, 3D Mini Foam Dots
CO721957 15"x15" Self Healing Mat
Have a crafty day!
Tracey R


6 comments