
The Little Things Layout with Anet
Hi Everyone,
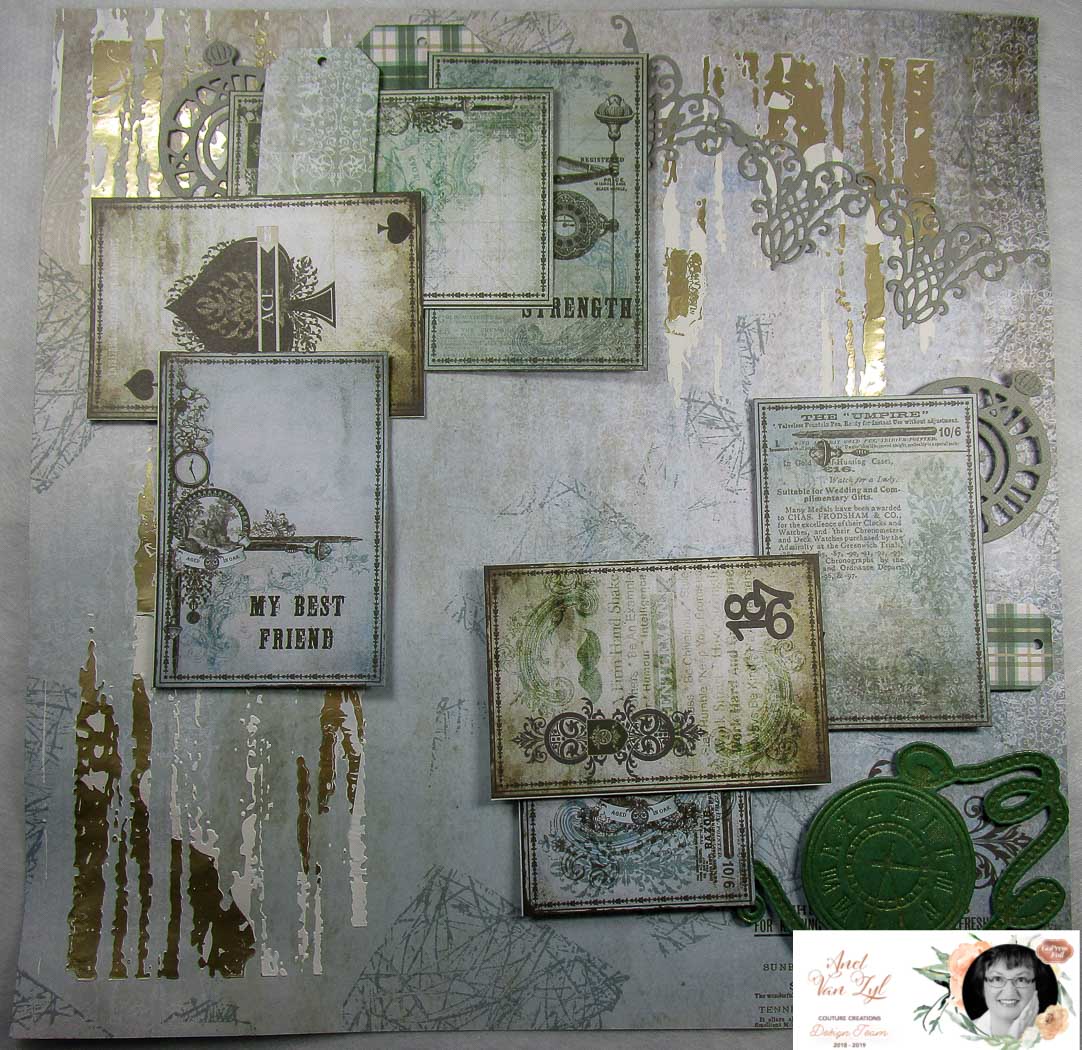
Anet here today and welcome to my inspiration post
Anet here today and welcome to my inspiration post
I have created my second Scrapbook Layout
with the new release Gentleman's Emporium Collection
from Couture Creations.
with the new release Gentleman's Emporium Collection
from Couture Creations.

Step by step instructions:
1. Trim barcode strip from Gentleman's Emporium pattern paper.
2. Randomly apply Gesso through stencil
onto the sheet front.


3. While the Gesso is wet place some
Couture Creations Heat Activated Foil over
stencilled area and press it down lightly.
Let it dry and peal off.
Tip: Use your scrap left over foiled strips
for this technique.


4. Randomly stamp background stamp onto sheet front.


5. Die-cut Silver Star Cardstock with
Gentleman's Emporium Thin Gentleman's Corner Die.
Adhere onto sheet front using 3D Foam Dots.


Adhere onto sheet front using 3D Foam Dots.


5. Die-cut Silver Star Cardstock with
Gentleman's Emporium Thin Gentleman's Corner Die.
Adhere onto sheet front using 3D Foam Dots.


- Ink Cut, Foil and Emboss Die with Brilliance Pigment Ink.
- Place Cut, Foil and Emboss Die onto C-Plate.
- Place Cut, Foil and Emboss Die onto C-Plate.
- Add Cypress Pine Cardstock.
- Add B-plate and wind through die-cutting machine.
Adhere onto sheet front using 3D Foam Dots.


7. Fussy cut Gentleman's Emporium pattern paper
and stick onto each other using 3D Foam Dots.
Adhere onto sheet front using 3D Foam Dots.


8. Die-cut Gentleman's Emporium pattern paper with Tag Die.
Adhere onto sheet front using 3D Foam Dots.


9. Die-cut Silver Star Cardstock with
Gentleman's Emporium Gentleman's Timepiece Die.
Adhere onto sheet front using 3D Foam Dots.


10. Trim Cypress Pine Cardstock to 11.8cm x 11.8cm.
Trim Silver Star Cardstock to 10.2cm x 13.3cm.
Stick photo onto cardstock and
adhere onto sheet front using 3D Foam Dots.

11. Trim Cypress Pine Cardstock to 12.7cm x 8.4cm.
Trim Silver Star Cardstock to 8cm x 13.3cm.
Stick photo onto cardstock and
adhere onto sheet front using 3D Foam Dots.


12. Die-cut Cypress Pine Cardstock Window Shutters and
Gentleman's Emporium pattern paper Clock Movements.
Stick onto each other and adhere
onto sheet front using 3D Foam Dots.


13. Die-cut Cypress Pine Cardstock and
Silver Star Cardstock Hearts.
Adhere onto sheet front using 3D Foam Dots.


- Close lid and heat up for 30 seconds.
- Wind slowly through die-cutting machine.
Adhere onto sheet front.


15. Die-cut Mirror Foil Board and Silver Star Cardstock with
Le Petit Jardin Morning Flourish Decorative Die.
Adhere onto sheet front using 3D Foam Dots.


16. Die-cut three Mirror Foil Board and white cardstock
Le Petit Jardin Evening Branches.
Adhere onto sheet front.


17. Die-cut white cardstock flowers and
colour with Distress Oxide.
Add Liquid Drops 3D Pearls and
adhere onto sheet front using 3D Foam Dots.


18. Die-cut three Mirror Foil Board leaves.
Adhere onto sheet front using 3D Foam Dots.


and stick onto each other using 3D Foam Dots.
Adhere onto sheet front using 3D Foam Dots.


8. Die-cut Gentleman's Emporium pattern paper with Tag Die.
Adhere onto sheet front using 3D Foam Dots.


9. Die-cut Silver Star Cardstock with
Gentleman's Emporium Gentleman's Timepiece Die.
Adhere onto sheet front using 3D Foam Dots.


10. Trim Cypress Pine Cardstock to 11.8cm x 11.8cm.
Trim Silver Star Cardstock to 10.2cm x 13.3cm.
Stick photo onto cardstock and
adhere onto sheet front using 3D Foam Dots.

11. Trim Cypress Pine Cardstock to 12.7cm x 8.4cm.
Trim Silver Star Cardstock to 8cm x 13.3cm.
Stick photo onto cardstock and
adhere onto sheet front using 3D Foam Dots.


12. Die-cut Cypress Pine Cardstock Window Shutters and
Gentleman's Emporium pattern paper Clock Movements.
Stick onto each other and adhere
onto sheet front using 3D Foam Dots.


13. Die-cut Cypress Pine Cardstock and
Silver Star Cardstock Hearts.
Adhere onto sheet front using 3D Foam Dots.


- Heat Metal Shim with GoPress & Foil Machine.
- Place Heat Activated Foil with the shiny side down.
- Place Couture Creations Chipboard
onto heat activated foil.
- Place Heat Activated Foil with the shiny side down.
- Place Couture Creations Chipboard
onto heat activated foil.
- Add a shim.
- Close lid and heat up for 30 seconds.
- Wind slowly through die-cutting machine.
Adhere onto sheet front.


Le Petit Jardin Morning Flourish Decorative Die.
Adhere onto sheet front using 3D Foam Dots.


Le Petit Jardin Evening Branches.
Adhere onto sheet front.


colour with Distress Oxide.
Add Liquid Drops 3D Pearls and
adhere onto sheet front using 3D Foam Dots.


18. Die-cut three Mirror Foil Board leaves.
Adhere onto sheet front using 3D Foam Dots.


Adhere onto sheet front using 3D Foam Dots to finish.

Here is the link to the video on how to
Ink and Cut with Cut, Foil and Emboss Die.
Video Link:
Couture Creations products I have used:

C0725032 GoPress and Foil Machine
C0726073 Golden Cream Light Mirror Finish Heat Activated Foil
C0726825 12x12 Paper - Gentleman's Emporium Double Sided Sheet 12B
C0726823 12 x 12 Paper - Gentleman's Emporium Double Sided Sheet 10A
C0726821 12 x 12 Paper - Gentleman's Emporium Double Sided Sheet 8B
C0726854 Gentleman's Emporium Pocket Watch Cut, Foil and Emboss Die
C0726831 Gentleman's Emporium - Gentleman's Timepiece Mini Die
C0726833 Gentleman's Emporium Thin Gentleman's Corner Mini Die
C0726551 Butterfly Garden Queen Bee Mini Die
C0725937 Le Petit Jardin Evening Branch Mini Die
C0725942 Le Petit Jardin Morning Flourish Decorative Die
C0725918 Chipboard - The Little Things Sentiment
ULT200031 Cypress Pine 12 x 12 Cardstock
ULT200004 Silver Star 12 x 12 Cardstock
ULT157649 Liquid Drops 3D Pearls Paroah
C0725410 Mirror Foil Board - Matte Gold
J7023-091 Brilliance Galaxy Gold Ink Pad
For Stockists click the link below:
https://couturecreations.com.au/pages/store-locator
Thank you for visiting today and I hope you enjoyed
how I created my scrapbook layout.
Happy Crafting!
Anet

Thank you for visiting today and I hope you enjoyed
how I created my scrapbook layout.
Happy Crafting!
Anet


0 comments